Drawing / Beginner
Draw an Open Paper Bag: Rim, Side Gusset and a Grounded Base
Build a plain paper bag from large planes, keeping the opening, side fold and base connected before adding crinkles.
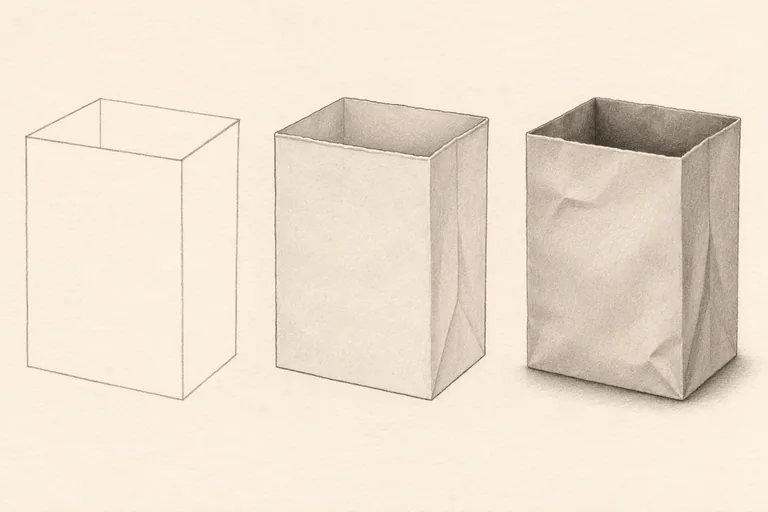
Open a plain bag and keep the folds simple
A small paper bag offers clear large planes with just enough irregularity to make an observation study interesting. Choose one without handles or printed graphics. Open it partway, place it on a table and adjust the mouth so you can see into it. Avoid crushing it into many tiny creases for this first study.
Use an HB pencil, drawing paper and an eraser. A slightly softer pencil is optional for the darkest recess. Set one steady light. The example image is an AI-generated explanation of the form, not a record of a physical drawing session or a pattern for constructing a real bag.
Mark the overall envelope of the shape
Lightly indicate the bag's height, width and base position. Compare the broad front face with the narrower visible side. Treat the main body as a simple box-like form first, following the actual leaning and narrowing you observe rather than imposing a perfect rectangle.
Canson's observation guidance recommends simplifying objects into basic volumes before refining them. Use that principle here to locate the main corners and supporting plane. Keep the bag's lower edge on the table so later fold marks do not make it appear to float.
Make the opening belong to the body
Draw the near and far edges of the open mouth as connected parts of the top shape. Compare their angles with the front and side planes. The opening is not a separate oval sitting on top of a rectangular object. Its corners must lead into the bag's visible edges.
Show only the narrow rim thickness you can see. A far inside surface may be visible behind the opening. Keep the back wall connected to the sides, and avoid drawing hidden bottom edges through the opaque front face.
Locate the side gusset
Find the inward fold on the narrow side. Mark the main crease lightly and observe how its upper section connects to the mouth. The fold may form an angular indentation rather than a flat stripe. Let its actual shape guide the line.
Do not draw a dark zigzag all the way down simply to signal folded paper. Some sections of the fold can disappear into similar values. Check that the side still has enough width to belong to the bag's volume and that the crease does not cut through the front plane.
Group the light, middle and dark planes
Keep the light-facing front comparatively pale. Use a middle value on the turning side where appropriate, and reserve the stronger dark for a small part of the interior or a tight fold. Work from your light setup rather than automatically making every inside area equally black.
Use broad gentle graphite marks first. Add a few short crease accents only after the bag reads as a solid object. A wrinkled paper surface contains many changes, but drawing them all with equal pressure can hide the much more useful front-to-side relationship.
Ground the bag and edit the crinkles
Add a restrained contact shadow beneath the base and a cast shadow that follows the reference light. Check whether the bottom edge is slightly irregular or folded. It should still support the bag convincingly. Avoid adding a heavy black border around the entire base.
Choose two or three crinkles to keep and let quieter areas remain simple. If the drawing feels busy, remove minor lines from the lighter plane before deepening every fold. For a more concentrated plane-value exercise, continue with drawing crumpled paper in three values.