Drawing / Beginner
Draw Crumpled Paper in Pencil: Find the Large Planes Before the Creases
Use a lightly crumpled sheet to study angular planes, connected shadow shapes and a few carefully chosen dark creases.
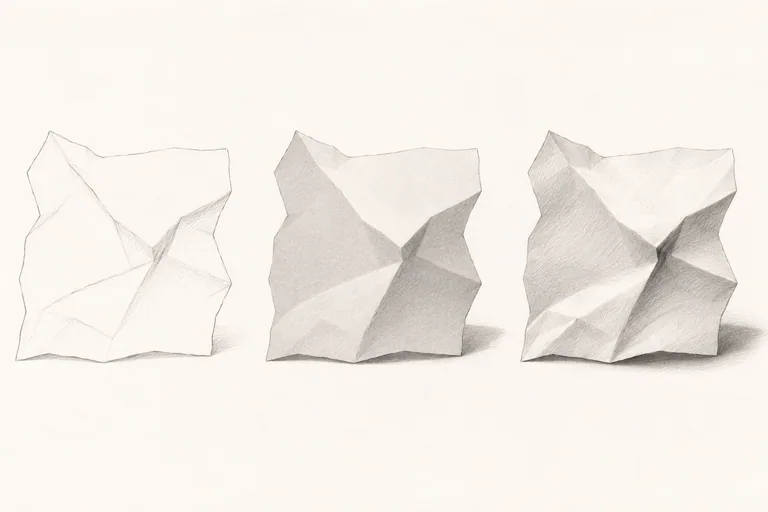
Make a reference with readable folds
A crumpled sheet can teach you to see surfaces without relying on familiar object details. Use plain matte paper and compress it loosely once, then open it partway. A dense paper ball contains many tiny folds; a broad, gently crumpled piece is easier to study. Put it on a plain surface under one steady light.
You need drawing paper, an HB or 2B pencil and a clean eraser. Work from the real paper or a photograph you take yourself. The illustration above is an AI-generated explanation of the exercise, not a record of a physical drawing session. Your fold pattern does not need to match it.
Draw the outside shape before the fold network
Mark the overall width and height lightly. Find the farthest corners and join them into an irregular silhouette. Compare the open spaces around the object to catch a section that has become too tall or too narrow. Keep the outline adjustable.
Choose four or five major junctions inside the shape. These are places where broad surfaces meet or a fold changes direction. Locate them relative to the outside corners rather than scattering short crease lines across the page. Every line should describe an observed change in the paper.
Group the surfaces into three values
Make a tiny value key beside the drawing: untouched paper, a light middle gray and a darker gray. Look for the broad light-facing planes first. Keep those areas mostly open. Shade the planes turning away from the light with the middle value, joining neighboring areas when they read as one larger shadow shape.
Canson's shading guidance explains how graphite can produce a range of grays and how hatch spacing changes the apparent darkness. In this exercise, use that range sparingly. The paper should read as folded white material before you add its deepest creases.
Let each plane have its own direction
Within a broad plane, use controlled hatching that stays visually coherent. Change the direction gently when the surface changes. You are describing an angular form, not filling a map with a different decorative pattern in every region.
Compare adjacent planes. If both are receiving similar light, they may need only a subtle boundary. A fold is not automatically a dark line. Some ridges can be shown by the meeting of a light plane and a middle-gray one, leaving the edge itself unoutlined.
Add the darkest accents selectively
Find a few narrow recesses where the paper folds tightly against itself. Place small dark accents there after the larger value pattern works. Keep them attached to believable fold junctions. Avoid drawing a continuous black network around every surface, which can make the object resemble cracked stone.
Add the cast shadow on the supporting surface, following the reference light. The contact is often more decisive than the softer outer shadow. Do not invent a second shadow direction to fill an empty part of the page. Lift a misplaced mark gently rather than rubbing until the drawing surface becomes rough.
Check the structure with the details covered
Squint at the reference and drawing, or view both from farther away. The large light and dark groupings should still agree. If the page looks busy but flat, simplify a cluster of little creases and strengthen one broad value difference instead.
For a repeat study, rotate the same paper under the same lamp and make a second small drawing. Compare how the value groups change while the material remains the same. Continue with hatching and cross-hatching if you want to practise the marks separately.