Drawing / Beginner
Draw a Teaspoon in Pencil: Connect the Bowl and Handle Before Reflections
Check the bowl angle, narrow neck and handle centerline before using a few light and dark shapes to suggest polished metal.
Choose a view with a visible bowl
Place one plain teaspoon on a light surface under steady light. Choose an angle that shows the bowl opening and the handle without strong foreshortening. Move your viewpoint before drawing if the bowl and handle overlap so much that the connection is difficult to read.
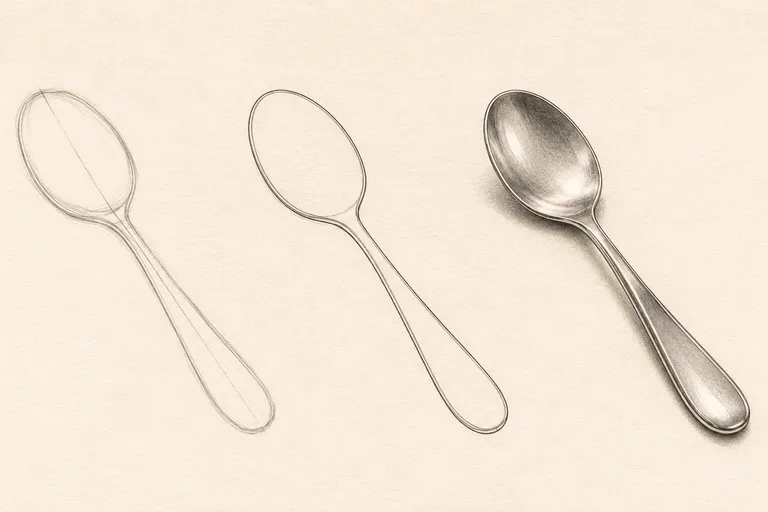
Use an HB pencil, an eraser and drawing paper. A 2B pencil can add selected darker accents. Work from the object or your own photograph. The stages above are AI-generated teaching illustrations; they simplify reflections and do not replace checking the proportions of your actual spoon.
Find the long direction and bowl shape
Mark the spoon's overall length lightly. Draw a centerline through the bowl, narrow neck and handle, allowing for the actual curve of the utensil. Compare the bowl length with the handle length before adding its outside contour.
Sketch the bowl as the oval or rounded shape you observe in perspective. It may look narrower than a full ellipse. Check its broadest point and the angle of its opening. Do not force a symmetrical oval if your chosen view makes one side more compressed.
Attach the handle through a believable neck
Place the narrow connection at the correct end of the bowl. Build both handle edges around the centerline, comparing their width as they move toward the end. Leave space for a handle that widens or curves according to the object rather than using a uniform ruler-like strip.
Step back and check that the bowl and handle belong to one utensil. If the neck appears to attach to the side, correct that relationship now. Reflective shading can distract the eye temporarily, but it will not repair an awkward connection.
Separate the inner bowl from the rim
Indicate the rim lightly, using the thickness you can actually see. Keep it narrow. Suggest the concavity with a broad interior value change rather than placing a dark oval inside a lighter oval. A continuous dark inner border can make the bowl look like a flat ring.
Canson recommends observing objects through simple volumes before refining their contours. Apply that approach to the spoon as a connected shallow bowl and handle. Keep the construction marks light enough to adjust without digging grooves into the paper.
Select a few reflection shapes
Look for one broad light area, a middle gray and one or two darker reflections. Place their shapes as you see them. A polished spoon can reflect its surroundings in unexpected ways, so do not invent a uniform shadow gradient simply because the surface is curved.
Keep the lightest parts mostly as clean paper. Use restrained graphite layers for the middle values, then add a few darker notes. Avoid outlining every reflected shape. The surface should remain connected even when the values change abruptly.
Add the contact and review the silhouette
Draw the shadow that connects the spoon to the table, checking whether the bowl or handle touches the surface. Keep the cast shadow consistent with the real light. If a section lifts slightly, its shadow may separate from the object; observe rather than assuming one even outline underneath.
Finally, inspect the silhouette without focusing on the shiny details. Check the bowl angle, neck position, handle width and overall length. For another observation exercise with an important inner opening, try drawing scissors by their gaps.