Watercolor / Beginner
Winter Watercolor Cards: Add Snow with a Few White Gouache Marks
Combine a dry watercolor sky with restrained opaque snow accents, testing the white paint before adding it to your evergreen trees.
Decide which whites are paper and which are paint
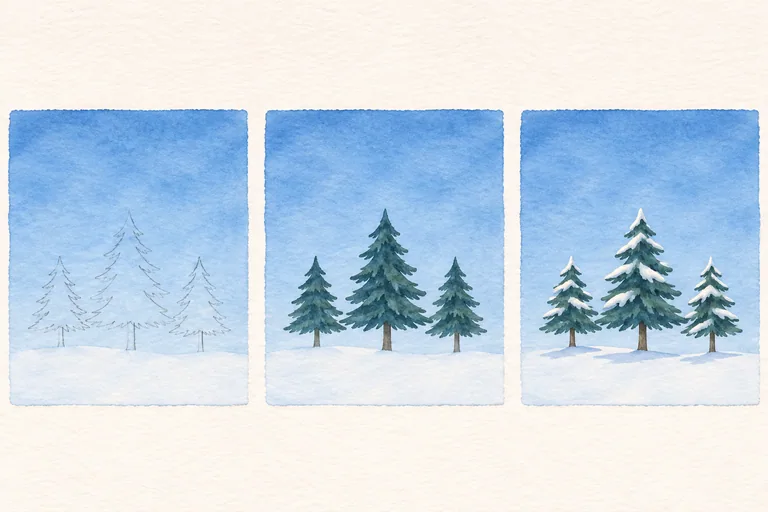
A small winter card can combine transparent watercolor with opaque white gouache. This is a mixed-media method: it differs from reserving every patch of white paper before painting. Choose a simple design with three evergreen trees of unequal height, a quiet blue sky and an open snow foreground. Keep the image area separate from any greeting.
Use watercolor paper, blue and green watercolor, white traditional gouache and a round brush. This lesson is not a guide to acrylic gouache, which has different drying behavior. Keep a clean palette area for the white and a scrap of the same paper beside your card.
Build the watercolor scene first
Paint a light blue sky wash while keeping the foreground pale. Let it dry completely. Add the three trees with a darker blue-green mixture, leaving some gaps between their branch groups. Make each trunk connect through its own tree rather than drawing a stack of detached zigzags.
Allow the trees to dry before preparing the snow accents. White gouache cannot repair a tree whose large shape does not work; it is easier to correct that drawing or keep the sheet as a study before decorating it.
Test opacity and brush pressure
Make a dark watercolor swatch on your scrap and let it dry. Mix a small amount of white gouache with enough water to move from the brush without becoming a runny wash. Place one light stroke across the dark swatch. Compare how it looks after drying, not just while wet.
Traditional gouache can reactivate when water is applied. Repeated brushing may disturb a lower gouache layer, and a wet brush can also lift some watercolor underneath. Test a single light pass before making more. If the white becomes tinted, clean the brush and allow the area to settle rather than scrubbing in another thick coat.
Place snow where it can rest
Add a few white marks to the upper surfaces of selected branch groups. Follow the branch direction and vary the mark lengths. Keep visible dark foliage underneath and between the snow patches. Covering every branch equally can erase the tree structure you just painted.
Use a restrained pale blue shadow in the foreground only after checking where the light comes from. You do not need to fill the scene with white dots. If you want falling snow, add a few deliberately placed marks after the larger snow shapes work.
Let the card dry before judging it
Check the darkest tree against the sky and the lightest snow against that tree. The scene should read through those larger differences before its small flecks matter. Do not close, stack or write on the card while the paint surface is still damp.
For a comparison, try the reserved-paper snow-tree lesson on another sheet. Decide which method suits the look you want; neither guarantees the finish shown on a screen. The generated illustration explains the proposed sequence and is not a recorded materials test.