Coloring / Beginner
Alcohol Markers on Printable Coloring Pages: Test the Paper Before You Color
Check the printed outline, sideways feathering and bleed-through on a small scrap before committing to a full coloring page.
Separate the three problems
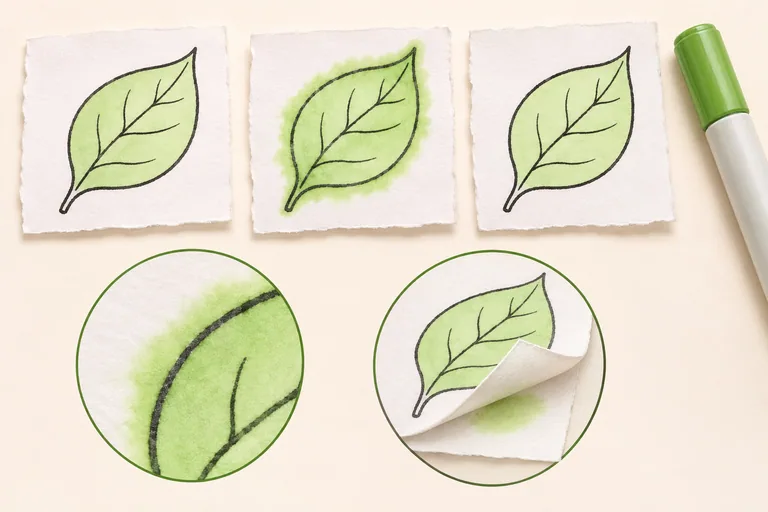
A printable coloring page can look sharp in the PDF and still behave differently once ink meets the printed sheet. Before coloring a whole scene, check three things separately: whether the black printed line smears, whether marker color travels sideways beyond that line, and whether ink reaches the back or the sheet beneath it. One successful check does not settle the other two.
The illustration above explains the idea; it is not a laboratory comparison of papers or printers. This LUREXEN exercise helps you check your own combination. You need one small printed test, your chosen marker, a protective scrap and a pencil for notes. Follow the marker manufacturer's handling guidance and work in a ventilated space.
Print a small section on the paper you will use
Choose a spare copy of a simple area from a coloring page you own or are allowed to print. A leaf, cup or window with an enclosed outline is useful. Use the same printer settings and paper as the finished page. A test on a different sheet tells you little about the final print.
Check your printer's supported paper type, thickness and feed instructions before trying marker stock. Heavy paper is not automatically compatible with a home printer, and paper sold for drawing may behave differently with alcohol ink. You do not need to buy a whole new pack before testing paper you already have.
Check the printed line first
Let the print dry according to your printer and ink guidance. On a spare part, pass a pale marker across a short black line. Look for a gray trail in the colored area or movement of the black edge. Stop if the print smears. Repeatedly coloring over it usually spreads the problem instead of solving it.
Give a fresh test more drying time if appropriate, or try another printer-compatible paper and repeat. There is no universal waiting time that makes every home-printer ink resistant to alcohol. If you cannot get a clean result, use colored pencils on that print instead.
Test an edge and a second layer
Place the test on a thick protective scrap. Color toward an outline, leaving a small gap at first. Watch how far the wet color moves before filling closer to the edge. Then make a second small sample with an extra pass. Compare the samples after the ink settles; do not keep saturating the same corner while deciding.
Turn the test over and inspect the protective scrap too. A front surface can look controlled while ink passes through underneath. Crayola recommends suitable marker paper, a protective blotter and lighter applications to reduce bleed-through. Keep protection beneath the finished page even when an initial test looks promising.
Choose a workable setup rather than a perfect promise
Write a short note on the back of your scrap: paper, print setting, marker and number of passes. Keep the sample with the finished artwork. If the edge spreads too far for tiny shapes, choose a page with larger areas or switch medium. If the back stains, print single-sided and protect the next surface.
For the first full page, begin in an inconspicuous area and work with a light hand. Check the underside occasionally. No paper recommendation replaces testing your actual materials. For an alternative approach, try light colored-pencil layers, which do not introduce the same alcohol-ink behavior.