Drawing / Beginner
Draw a Christmas Shop Window: Depth, Reflections and a Clear Focal Point
Sketch one festive display behind a simple window frame, using a deep sill, controlled overlaps and a few restrained reflections.
Choose a display with room around its objects
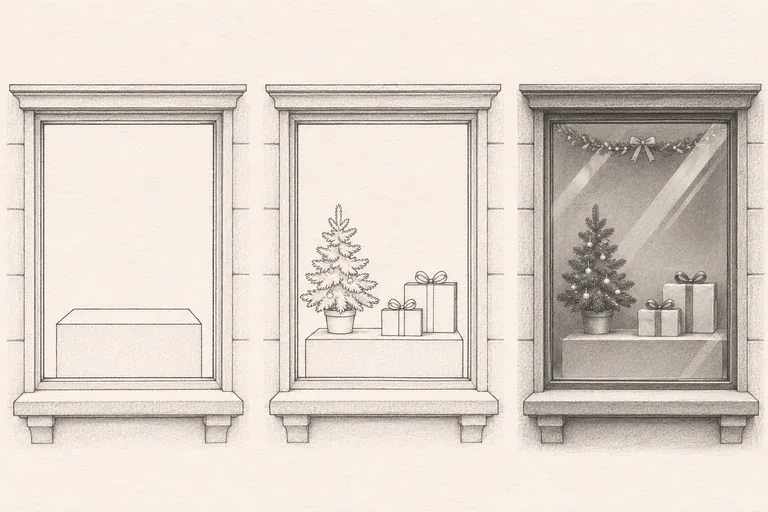
A Christmas shop window can quickly become a collection of unrelated details. For this exercise, limit the display to one small tree and two gift boxes behind a single window. Use your own photograph, a real window you can observe safely, or the illustrative arrangement above as a starting idea.
Use an HB pencil, eraser, ruler if helpful and drawing paper. A 2B pencil can add darker accents later. Choose a nearly straight-on view to keep construction manageable. If you choose a strong corner view instead, the frame will need a different perspective setup.
Build the frame before the display
Mark the outer window rectangle with light horizontal and vertical lines. Add the inner opening, keeping the frame thickness believable around it. Indicate a short reveal and sill so the glass has a position within the wall rather than floating as a rectangle on the page.
Front-facing edges remain level or vertical in this exercise. Visible depth edges should agree with the chosen viewpoint; they should not tip randomly in opposite directions. Keep the light construction visible until you have checked all four corners.
Give every object a supporting surface
Place a simple low box or display plinth behind the glass. Make its top surface and front thickness readable. Position the tree on the left and two gift boxes on the right. Check their bases against the surface before drawing branches or bows.
Use overlaps to separate the boxes: let the nearer box interrupt the farther one’s edge. Do not draw hidden edges through solid objects. Leave an open gap around the tree tip and keep the gifts smaller than the window opening. Empty space helps the display feel intentional.
Choose the focal point through value
Make a small three-value plan beside the main drawing: paper light, middle gray and a restrained dark. Choose the tree as the focal point for this version. Give it the clearest dark-and-light contrast while keeping most of the back wall quieter.
Use a few contact shadows beneath the tree container and gifts. Deepen selected frame recesses to distinguish the foreground frame from the display behind it. Avoid outlining every branch with equal pressure; group foliage into a few irregular masses and preserve gaps.
Add reflections that do not hide the scene
Glass does not require a dark diagonal stripe across every object. Begin with one or two pale reflected bands, suggested through lightly lifted graphite or quieter areas. Keep the bands subordinate to the display. In a real reference, reflections may show nearby buildings or sky; this simplified exercise deliberately leaves most of that information out.
Do not erase aggressively across the paper. Lift gently with a clean eraser and test first on a scrap if your surface marks easily. If a reflection destroys the tree silhouette or makes a gift appear cut apart, reduce it rather than adding more reflected objects to explain it.
Keep the festive trim secondary
A short garland along the top edge can suggest Christmas without filling every corner. Place it after the frame reads clearly. Avoid using trim to cover an unresolved frame joint. Leave signs and lettering out of this first study so perspective, depth and glass stay the main objectives.
At arm’s length, you should identify the frame first, a display resting behind it and one focal object. If everything looks equally dark, lighten a broad background area or make the next attempt with fewer marks. Continue with Cozy Corners Drawing for related interior construction practice, or repeat this free exercise with a different two-object display.