Drawing / Beginner
Draw a Curling Ribbon: Follow the Front, Back and Overlaps
Treat a ribbon as one continuous strip, checking its width and hidden edges before using shadows to separate the turns.
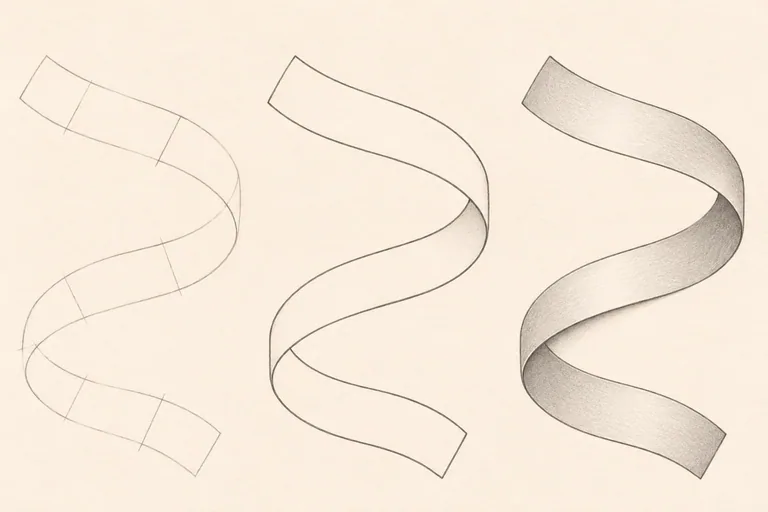
Arrange one simple strip
Use a broad strip of plain ribbon or paper and give it one gentle curl or half-turn. Leave two free ends visible. A complicated bow contains several additional construction problems, so keep knots and multiple loops out of this first study.
Place the strip on a light surface beneath one steady light. Use an HB pencil, drawing paper and an eraser. Work from the actual strip or your own photograph. The image above is an AI-generated explanation, not a substitute for checking whether your particular arrangement is physically possible.
Trace the route before drawing both edges
Mark a light center path that follows the strip from one free end to the other. Notice where it rises, turns and returns toward the supporting surface. Keep the path simple enough that you can follow it with your eyes without jumping between disconnected shapes.
Add a few short width guides across the path. Their apparent width can change with the view, but they should belong to the same strip. Avoid beginning with a pair of decorative wavy lines that repeatedly merge and split.
Build the two edges around the turn
Connect the width guides into two coherent boundaries. At a half-turn, observe how the visible face narrows and reveals the reverse. The edges must remain part of the same continuous material; a sudden branch means the construction needs another look.
Keep your lines light near the turn. It can help to point to one real edge and follow it along the strip before copying it into the drawing. Do the same with the other edge. This is more useful than adding shading to an unclear outline.
Decide which section passes in front
At an overlap, identify the nearer section. Let it interrupt the farther section's edge. Do not draw a hidden boundary through the opaque ribbon just to explain the whole route. The viewer should understand the crossing without seeing every concealed part.
Check both sides of the crossing. A section should not pass in front on one edge and behind on the other unless a real turn explains the change. If the drawing resembles an impossible loop, simplify the arrangement and rebuild the crossing before continuing.
Use value to describe surfaces, not rescue them
Place a broad pale or middle-gray tone on the face turning away from your light. The reverse side is not automatically the darkest part; its angle matters. Reserve a stronger narrow accent for a tight overlap or contact where the reference supports it.
Use controlled hatching that relates to the surface direction. Keep the light-facing portion open enough to contrast with the turn. Canson's shading reference explains general graphite value control; the ribbon's specific shadow arrangement comes from your own observation.
Follow the strip one final time
Start at one end and trace the visible construction with your eyes. Check that the strip has consistent material width, a connected turn and an understandable overlap. Then check its contact shadow against the supporting surface. Do not add an outline-like shadow everywhere the strip floats.
For a second study, change the curl while keeping the same strip and light. Compare how the exposed reverse face changes. If broad plane values remain difficult, try the three-value paper study before returning to a more complex ribbon.