Drawing / Beginner
Draw One Ice Skate: Boot Silhouette Before Laces and Blade Details
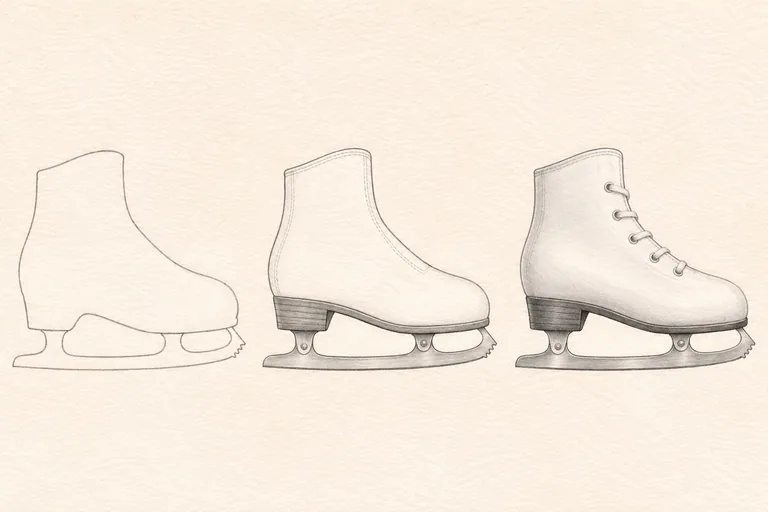
Build a winter figure-skate drawing from its boot, sole and single blade, checking the spaces between the supports before adding laces.
Choose one skate and a clear side view
Winter skating scenes are full of moving people, but one stationary skate is enough for a focused drawing. Use a real skate placed safely on a stable surface, your own photograph or a reference you are allowed to study. Begin with a figure skate in side view. A hockey skate has a different boot and blade profile, so avoid mixing parts from both types.
Use an HB pencil, an eraser and plain paper. Riedell’s generic component diagram identifies the boot, tongue, laces, heel, blade and toe pick. Use that terminology to understand your subject, not as a substitute for observing its particular shape. No equipment fitting, blade maintenance or skating instruction is included here.
Set the boot above a blade line
Mark the overall height and the distance from the back of the heel to the toe. Sketch the ankle opening, the heel curve and the toe before adding laces. Compare the ankle width with the length of the foot section. A familiar boot can still become stretched if you draw its details one at a time without checking the whole silhouette.
Lightly indicate the blade’s position below the boot. Keep it separate from the sole. Follow the blade shape in your reference, including its gentle curve and any toe-pick projection. Do not turn every metal edge into a second runner.
Check the gaps under the sole
Find where the blade assembly connects beneath the boot. Draw the visible supporting shapes, then compare the empty spaces between them. Those openings help you judge whether the boot appears attached or floating. Their shape will vary with the skate, so do not add a fixed number of tiny brackets from memory.
Place the heel above its actual connection. Check that the blade continues coherently underneath, rather than beginning again on the other side as an unrelated object. If the mounting structure is confusing, enlarge this part on a separate scrap before completing the small drawing.
Use laces as a finishing layer
Indicate the tongue and the direction of the fastening area. Add a restrained sequence of lace crossings that follows that direction. In a strict side view, some crossings and eyelets may be partly hidden; do not force a symmetrical front-facing ladder onto the side of the boot.
For the white boot, preserve a large light area and add quiet shadows at the ankle turn, under the tongue and above the sole where your reference supports them. Suggest the metal with a few clear light and dark bands rather than a dense scribble of reflective marks.
Count the physical parts before finishing
Check one boot, one sole structure and one continuous blade. Verify that visible supports meet both the boot and blade. Keep brand lettering out of this first study and add only a small ground shadow consistent with your reference.
For a simpler related subject, try the ankle-boot construction lesson. When the single skate works, a later drawing can add its partner from a different angle. The generated stages are simplified visual references; the real object decides its connections.