Drawing / Beginner
Draw a Knitted Scarf: Fold Shadows Before Stitch Texture
Make a soft winter scarf readable with a simple overlap, three values and a few stitch rows that follow the drape.
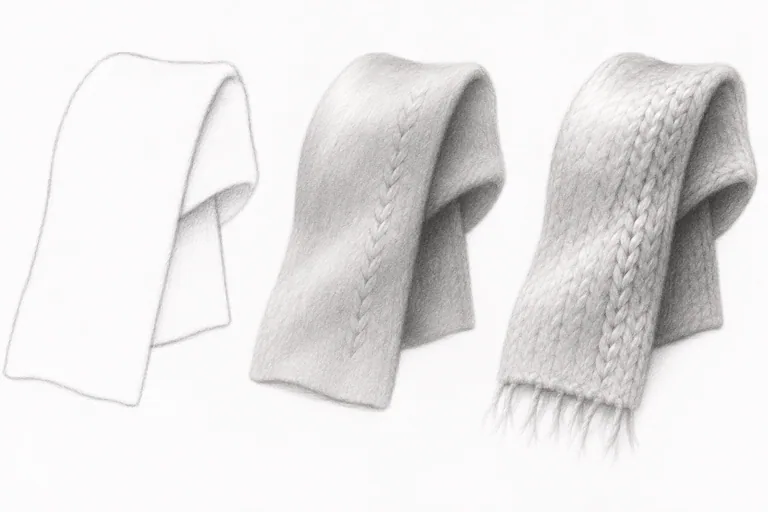
Fold the scarf once
Knitted fabric can become a maze of tiny marks if you begin with the stitches. Instead, fold a scarf so one end overlaps the other, place it under one steady light and study the large shapes. Choose a view with one clear fold rather than several tangled layers. A plain knitted sample is easier to start with than a strongly patterned scarf.
Use drawing paper, an HB pencil, an eraser and a softer pencil if available. Make the study large enough to leave room for a few visible stitches. You can draw from your own photograph if the real scarf will not stay in place.
Establish the three values
Sketch the outer contour and the edge of the overlapping end. Mark the light upper surface, the middle-value hanging section and the darker area tucked beneath the overlap. Shade these areas lightly with broad strokes before adding any knit detail.
Look for the cast shadow from the top layer onto the lower one. Its edge may be sharper close to contact and softer where the fabric lifts away. Keep the light area open; a uniformly gray scarf will be difficult to make soft just by adding more texture.
Practice a short stitch column
On a separate scrap, draw five or six small V-shaped marks in a loose column. Keep the pressure light. Add a second column with a little variation rather than making a perfect printed pattern. The V motif is a simplified cue for stockinette knitting, not a diagram of every possible knitted fabric.
Compare your scarf with the test. If its knitting uses a different visible pattern, adapt the marks to what you see. A ribbed or chunky scarf may need broad alternating ridges instead of tiny V shapes.
Let the rows bend with the fold
Add only a few columns over the already shaded form. Let their direction curve with the fabric and their spacing appear closer where the surface turns away. Fade the marks in the light and deepen a few gaps on the shadow side. Do not put the same dark stitch on every part of the scarf.
For the fringe, group strands first and add only a few individual ends. Keep their attachment to the fabric clear. Too many equally sharp strands can pull attention away from the main fold.
Check the fabric without its pattern
Step back or cover the detailed patch with a finger. Does the overlap still read? Can you identify a light surface and a tucked underside? If those disappear, improve the broad shading in a second study before adding more stitches.
Try one version with only ten stitch marks and another with a small textured patch. Decide which gives enough information for the drawing’s size. Continue with the fabric-fold lesson or the grouped-thread study. The illustration shows a proposed sequence, not a photograph of a finished classroom exercise.