Drawing / Beginner
Draw a Decorative Tassel: Thread Groups, a Wrapped Neck and a Soft Fringe
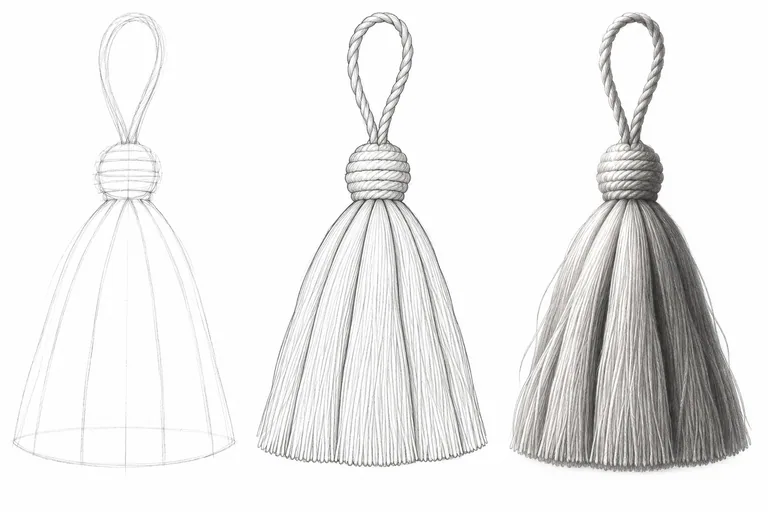
Turn a hanging tassel into a manageable pencil study by drawing its silhouette and broad thread groups before adding selected strands.
Find the silhouette first
A tassel is a useful seasonal subject for studying soft texture without filling the page with lines. Look at one hanging from a ribbon, cushion or ornament, or use a reference image you are allowed to study. Its loop, wrapped neck and loose body make three different kinds of shape. Keep the exercise to one tassel on plain paper.
Use an HB pencil for the first drawing and a softer pencil if you have one for darker accents. Choose one steady light source. Draw a light center line, then mark the top of the loop, the wrapped neck and the bottom of the fringe.
Give each part a clear job
Draw the loop as a narrow curved band connected to the top of the neck. Leave an opening inside it. Place a small rounded or cylindrical wrapped shape below. From its lower edge, let the loose body flare outward. Compare the widest point with the neck rather than making every part the same width.
Check the overall outline before adding texture. If the tassel looks stiff, vary the lower fringe slightly and allow one side to hang differently. Keep the loop attached convincingly; it should not float above the body.
Divide the body into broad groups
Separate the loose strands into four or five tapered groups. Use gentle curves that travel down from the neck. These are planning shapes, not thick outlines between every thread. Shade the side away from the light with soft parallel strokes following the fall of the strands.
Add darker narrow gaps between only a few groups. Keep the lit side quieter. Drawing every strand at the same darkness can make the object look like wire rather than soft thread.
Wrap the neck and soften the fringe
Use short curved strokes across the wrapped neck, following its round form. Darken the lower junction where the loose strands emerge. Add a few long thin lines through the body and a few uneven ends at the bottom. Let some strands disappear into a mid-tone group.
Use an eraser sparingly to lift a small light band if your paper allows it. Do not rely on erasing deeply pressed grooves. Keep the first layers light enough that later marks can still change the form.
Check at arm’s length
Cover the small strand details. Can you still see a loop, a firm wrapped neck and a soft hanging body? If so, the large shapes are doing their work. Try a second small version with the light coming from the opposite side. Keep the same silhouette and move the shaded groups.
For a related way to organize soft material, use the fabric-fold study. The generated image is a proposed drawing example, not a record of an observed model.