Drawing / Beginner
Draw a Nutcracker in Pencil: Simple Shapes Before Decorative Details
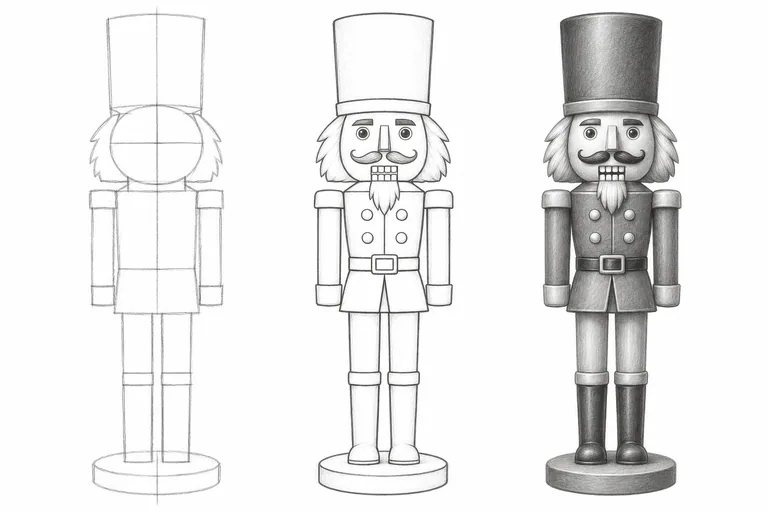
Build a front-facing toy nutcracker around a centerline, keeping the head, jacket, arms and boots aligned before adding ornament.
Study a generic toy, not every decoration
A nutcracker makes a useful festive drawing because its large forms are easy to name even when its costume is ornate. Choose a simple wooden toy or your own photograph in a front-facing view. Set aside buttons, curls and braiding until the whole figure stands convincingly.
Use an HB pencil, an eraser and drawing paper. A 2B pencil is useful for selected darker marks. Canson’s festive nutcracker lesson provides related construction context; the pencil exercise here uses our own sequence and a generic toy design rather than reproducing its illustration.
Set the centerline and major height divisions
Draw a light vertical line through the planned hat, face, torso and base. Mark the overall height and width. Divide the height into the main shapes you actually observe: hat, head, jacket, legs and boots. Do not assume every toy uses the same proportions.
Sketch an oval or rounded block for the head, a simple hat block and a jacket rectangle. Compare the width on each side of the centerline. If the torso leans, correct it while the marks are light. A face full of details will not straighten a tilted body.
Attach exactly two arms and two legs
Place one arm on each side of the jacket. Use simple cylinders or long rounded blocks, with the hands attached at their lower ends. Check both shoulder heights and the gaps between the arms and body. In a straight-on pose, those negative spaces help reveal an uneven placement.
Place two separate leg forms beneath the jacket and connect each to one boot. Give both boots a readable contact with the base. Hidden joints do not need dark outlines, but every visible limb needs a clear origin and end. Avoid allowing coat trim to look like another leg.
Fit the face inside the head shape
Use a light horizontal guide for the eyes and keep them on the same head plane. Place the nose near the centerline, then a simple moustache and mouth structure below. Keep the beard attached beneath the chin. Work from large relationships before adding pupils or individual hairs.
A nutcracker is a stylized wooden object. You do not need portrait anatomy, but the facial parts should still fit within the head. If one moustache curl is wider, compare it to the other before increasing line weight.
Add a small amount of costume detail
Choose only a few repeated features: a row of buttons, simple cuffs and a hat band. Measure the spacing lightly before darkening them. Keep the center of the jacket readable; many dark crossing lines can obscure the torso shape.
Suggest the rounded arms with a light side tone. Darken the contact beneath the hat brim, the separation between the boots and a few jacket recesses. Preserve white and middle-gray areas so the figure does not become one dark silhouette. Follow one consistent reference light.
Check the figure before calling it finished
Cover the facial details briefly and look at the silhouette. Does the toy still read clearly? Check the centerline, shoulder level, paired arms, two legs and boot contacts. Correct the largest imbalance before refining a tiny button.
For a second study, change the hat decoration while keeping the same construction. A generic toy drawing can become a card illustration without borrowing a film character or another artist’s design. The image above is an AI-generated teaching illustration, not a recording of a physical pencil session.