Drawing / Beginner
Shade a Pear with Curved Hatching: Spacing Before Extra Pressure
Use a simple pear to compare line spacing and selective crossing while keeping the light side open.
Choose a shape you can simplify
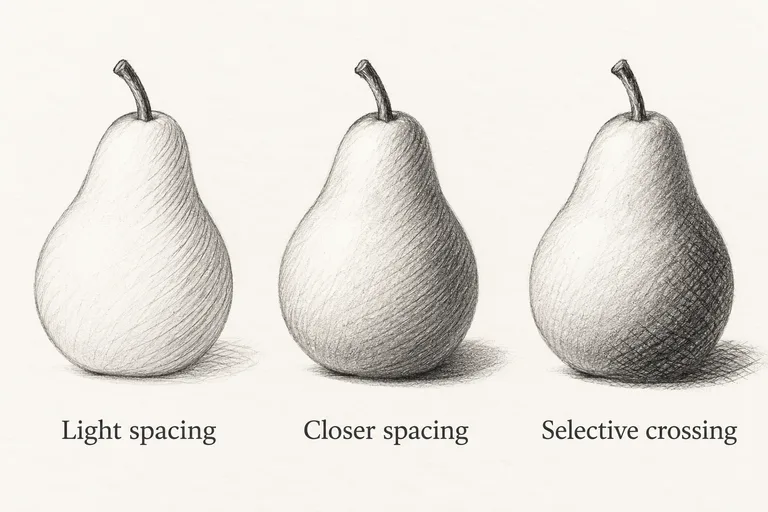
Place a pear beside a single light source, or use your own reference photograph. Look for the broad lower body, narrower neck and a small contact shadow. Make three small outlines on drawing paper. Keep their proportions similar enough that you can compare the shading without being distracted by different silhouettes.
An HB or 2B pencil is enough for this exercise. Test a few marks first. A softer pencil is not automatically better: choose one that produces visible lines with comfortable pressure on your paper.
Reserve the light side
Decide where the light comes from before shading. In the example it is upper left. Leave that side mostly bare. Indicate the shadow area with a few faint curved strokes that turn around the pear's body. Imagine each stroke resting on the surface rather than cutting straight across it.
You do not need a dark perimeter around the whole fruit. A heavy continuous outline can dominate the quieter changes inside. Keep the first contour light enough to adjust.
Change one thing at a time
- Pear one: add a single family of widely spaced curved lines on the shadow side. Keep the marks light and stop before crossing them.
- Pear two: use a similar pencil pressure, placing lines closer together in the darker area. Let them become more widely spaced toward the light.
- Pear three: start with the second approach, then add a short second family of lines only in the deepest shadow and contact area.
Canson describes spacing and crossing as ways to vary hatched values. This pear exercise isolates those choices so that pressing harder is not your only way to darken a drawing.
Keep crossing selective
Turn the second family slightly so it crosses the first while still suggesting the rounded form. Avoid covering every area with the same mesh. Preserve the highlight and some middle-value passages with fewer marks. Pause after a small patch and compare it with the rest.
Add a short contact shadow where the pear meets the table. Observe its direction in your reference rather than placing a decorative oval beneath everything. The shadow can help anchor the fruit, but it should not compete with the main form.
Check from a distance
Hold the page at arm's length. Can you still distinguish the light side from the shadow? Does the lower body feel rounded? If all three studies look equally dark, make the first more open next time instead of increasing pressure everywhere.
If your lines look scratchy, slow down and shorten them. If they form rigid bands, vary their starting points while keeping a coherent direction. If a dark patch is too strong, avoid grinding an eraser into the paper: a new small study is often the more useful comparison.
Finish by noting which version is easiest to read. Then try the same spacing exercise on an apple. The goal is transferable control of value, not an identical copy of the example. See the pencil shading lesson for a broader introduction to light and form.