Drawing / Beginner
Draw a Pine Sprig: Needle Pairs, Twig Connections and Clear Gaps
Follow a small woody twig, group the needles around visible attachment points and preserve open spaces instead of building a dark scribble.
Choose a short twig rather than a whole tree
A small evergreen study can fit a winter sketchbook margin or a handmade card. Begin with one short sprig and a few visible needle groups. This keeps the exercise focused on attachment, direction and spacing rather than the silhouette of an entire tree.
Use an HB pencil, drawing paper and an eraser. Observe a fallen sprig you can identify or a clear reference photograph you are permitted to use. Different conifers have different leaf arrangements. The Woodland Trust describes Scots pine needles as growing in pairs; do not assume the same grouping applies to every pine, fir or spruce.
Trace the woody route first
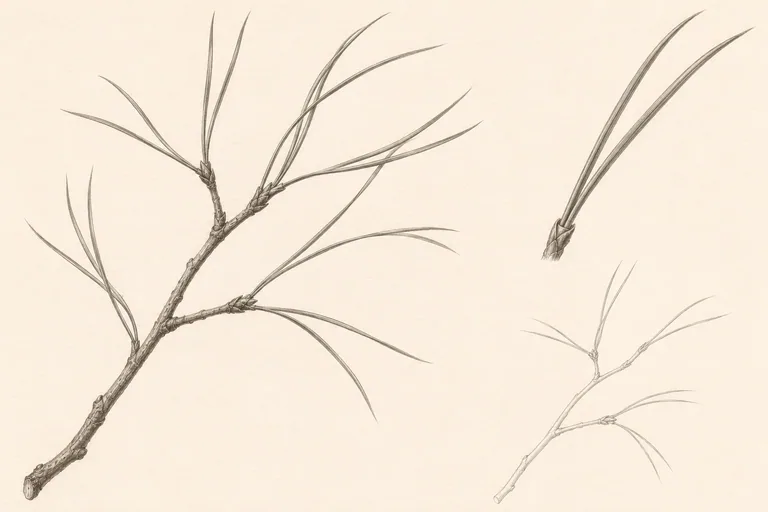
Draw the main twig as one connected, gently changing path. Add only the offshoots you can follow back to it. Give the twig some width and let smaller branches emerge from visible junctions rather than floating beside it.
Keep bark marks out for now. Look at the ends, the bend and the relation between the thickest and thinnest sections. A few well-placed branches will provide a better framework than a dense mass of needle lines hiding an uncertain stem.
Study one needle pair separately
Beside the main sketch, draw two long needles that meet at one small shared base. Observe how they separate and taper. They may bend, twist or overlap in the view; they do not need to form an evenly opened letter V.
Use the enlarged pair as an attachment exercise. Keep both needles slender, and avoid giving each the broad flat outline of an ordinary leaf. The illustration above is an AI-generated artistic reference, not a botanical identification plate. Let a verified plant reference settle species details.
Arrange groups around the twig
Place several attachment points on the main sketch and build a limited number of needle pairs from them. Vary their direction according to the reference. Some can point forward, some sideways and some partly behind another group.
Leave paper between neighboring clusters. Check the shape of those gaps as deliberately as the needles themselves. Identical fans repeated at equal distances can look like a decoration stamped along a line. Real growth usually gives a more varied rhythm.
Strengthen a few connections
Use slightly darker marks at selected junctions and on a few nearer needle edges. Let other lines remain pale or disappear where they are difficult to see. This variation can help separate overlapping groups without turning every needle into a heavy black strip.
Add a little twig texture only after the structure reads clearly. Short irregular marks may be enough. Avoid shading every space between the needles: the open paper is part of what makes the sprig feel light.
Check the drawing from a distance
Step back and see whether you can still follow the woody twig through the foliage. The needle groups should feel attached, and the spaces should remain distinct. If a section becomes a dark knot, simplify it in a second study rather than adding more lines.
Try drawing the same sprig again with roughly half the marks. Compare which connections are essential. For another plant with a different growth pattern, use the fern-frond lesson. Its leaflets follow a different structure; the useful shared habit is observing attachment and spacing, not copying the same marks onto every plant.