Drawing / Beginner
Draw a Scallop Shell: Silhouette First, Ribs Second
Organize a shell around its hinge and broad outline, then add only the ribs and shadows that explain its form.
Choose a clear shell reference
Use a shell you already own or your own photograph. A fan-shaped scallop shell seen mostly from above is a manageable starting point. Identify the narrow hinge and the broad outer rim. Avoid beginning with the tiny ridges: they are easier to place once the main shape is convincing.
You need drawing paper, a pencil and an eraser. Keep the shell in one position while you work. Moving it repeatedly changes the visible outline and shadows, making the comparison harder than it needs to be.
Find the envelope and hinge
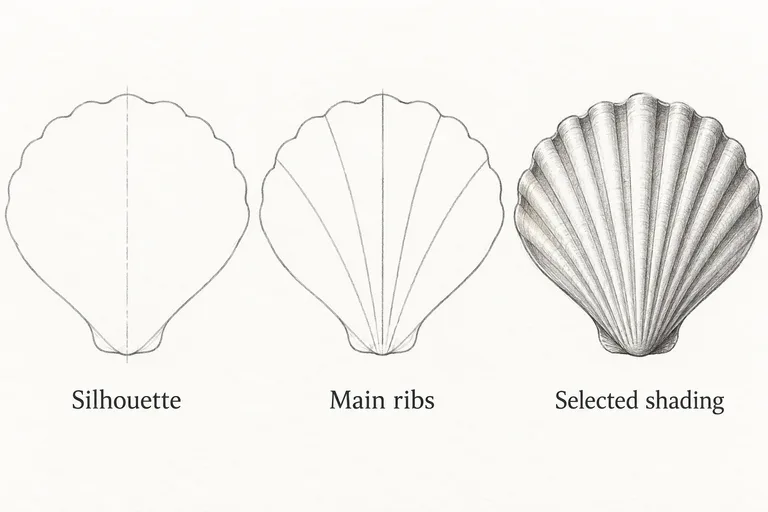
Lightly mark the top, bottom and widest points. Compare the width with the height before connecting them. Use a simple fan-shaped envelope, then adjust the rim to the particular shell. Real shells may be uneven, tilted or damaged; do not force perfect symmetry when your reference shows otherwise.
Mark the hinge and a faint central direction from it toward the broad rim. This line is a temporary guide, not a dark feature you must leave in the finished drawing. Check whether the two sides spread equally or one appears narrower because of the viewing angle.
Place a few main ribs
- Begin near the center. Follow one visible rib from the hinge toward the rim, noticing any bend.
- Add a rib on each side. Compare the spaces between them rather than guessing a fixed angle.
- Fill only the largest gaps. Use a few more guide ribs to describe the fan. Do not count the illustration's ribs as a rule for your own shell.
- Refine the rim. Relate the scalloped edge to the ribs you can actually see.
The National Gallery of Art describes contour and hatching as ways to communicate shape and tone. Here, the outline establishes the shell before the internal marks describe its surface.
Shade selected channels
Observe which sides of the ribs face away from the light. Add short, light strokes in a few channels, keeping the raised areas quieter. The darkest channel will depend on the light and shell tilt; it is not automatically every second groove.
Choose one area for closer inspection and leave the rest simpler. A dark line down every groove can turn the shell into a striped diagram. Let some marks fade or break so the overall form stays more prominent than the repeated pattern.
Check the big shape again
Cover the interior with your hand for a moment. Does the remaining outline still resemble your shell? If not, adjust the width, hinge position or outer rim in the next study. Adding more ribs will not solve a silhouette that is too narrow.
For a useful follow-up, rotate the shell slightly and make a second small outline with only five guide ribs. Compare how the spaces change. This is an observation exercise, not a geometric formula. Read the pencil shading lesson for additional practice with light and form.