Drawing / Beginner
Draw Two Stacked Books: Align the Covers Before Adding Page Lines
Build two closed books as simple solid forms, checking thickness, overlaps and the difference between covers and page blocks.
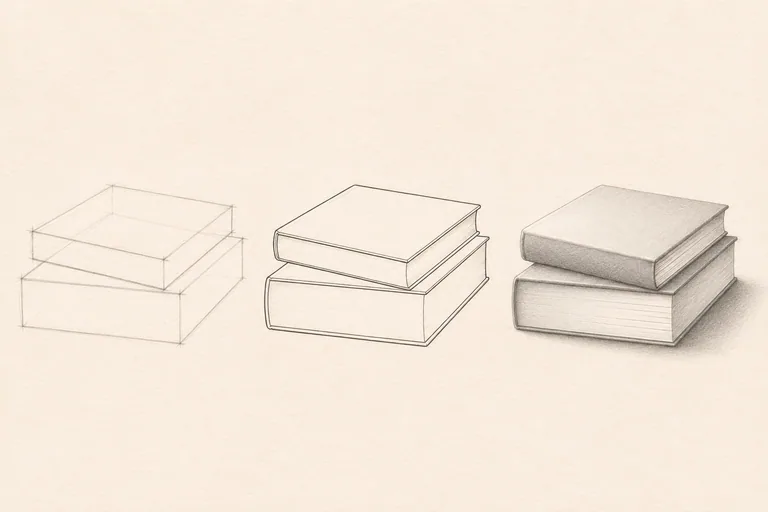
Arrange two books with different thicknesses
Place two closed, unbranded books on a stable table, with the upper book turned only slightly. Choose a view that reveals a top cover and at least one page block. Avoid a steep angle for the first attempt. Use a steady light and keep the arrangement still while you draw.
An HB pencil, an eraser and drawing paper are enough. A softer pencil is optional for the contact shadow. This is an observation exercise: your books may have different proportions from the illustrative stages above. Ignore cover lettering and publishers' designs so the form remains the main problem.
Block in the large forms
Mark the overall stack height and width. Sketch each book as a shallow box, starting with the broad top plane you can actually see. Compare the angles of its edges against the reference. Depth edges should follow a coherent perspective rather than tipping independently.
Give the lower book its own direction. The books can be rotated differently, so do not force all their edges toward the same vanishing direction. You do not need to locate distant vanishing points on a small sheet; compare visible edge slopes and the amount each plane narrows.
Check the overlap before the page block
Locate the corners where the upper book interrupts the lower one. Draw visible edges and leave hidden edges out. Check that the upper book rests on the lower cover rather than floating above it. A small contact shadow will support that relationship later, but it cannot fix incompatible corner positions.
Look at the negative spaces around the stack and the wedge-shaped gap made by a rotated corner. Compare those shapes with the reference. If the top book seems to slide through the lower one, correct the large planes before drawing a spine or page edges.
Separate covers from paper
Indicate the cover thickness as a narrow solid rim. Then place the page block slightly inside it where the reference shows an overhang. Keep that inset consistent enough to suggest a bound object. A paperback may have a very small overhang, so avoid exaggerating it automatically.
The spine is not simply another page edge. Show its rounded or squared form according to your book. Keep the top and bottom cover relationships connected around the corners. Leave the title blank; tiny lettering can distract you from a cover that is not yet sitting convincingly in space.
Suggest many pages with a few marks
Use a light overall value for the paper block, followed by a small number of fine lines following the visible page-edge direction. Vary their length and spacing. Drawing every page as an equally dark stripe makes the block too busy and can flatten the form.
Add one clearer contact shadow between the books and a restrained cast shadow beneath the stack. Keep the light source consistent. Use Canson's value and hatching principles as technical background, while judging the actual shadow shapes from your own arrangement.
Use the stack as a composition exercise
Step back and check the four big relationships: each book's width to thickness, the upper-to-lower overlap, the cover-to-page inset and the cast shadow direction. Correct one major issue before darkening details. A clean simple study is more useful than a heavily rendered crooked box.
Try the stack beside a cup only after the two-book study works. For a related object exercise, see drawing a mug handle by its inner space. Keeping the subjects separate at first makes each construction problem easier to understand.