Drawing / Beginner
Draw Eyeglasses: Align the Lenses Before Adding Reflections
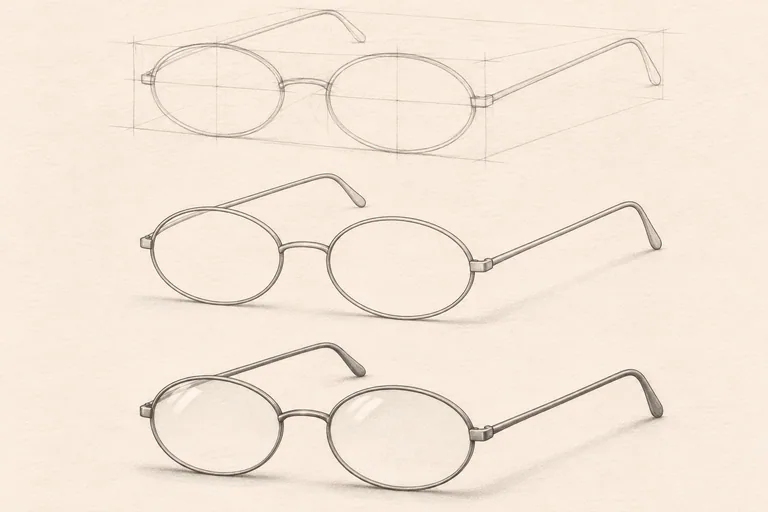
Construct two connected lens rims, a believable bridge and two attached temple arms before adding a few quiet glass reflections.
Choose a view you can keep still
Place a plain pair of eyeglasses open on a table and choose a nearly front-facing or mild three-quarter view. Avoid a steep angle for the first study. Work from the object or a photograph you take yourself, and keep the position unchanged while checking the frame.
Use drawing paper, an HB pencil and an eraser. A slightly softer pencil is optional for dark accents. The illustration above is an AI-generated construction example; your glasses may have different rim shapes, bridge heights and arm curves. Do not force a real reference to match the example.
Locate the two lens rims as one frame
Lightly mark the overall width and height of the front. Place two simple guide shapes for the rims before drawing their thickness. Compare the top and bottom positions, the gap between them and the angle of the frame across your view.
In a three-quarter view, the farther rim may appear narrower. Check the actual relationship rather than drawing two equal circles and shifting one sideways. Canson's perspective guidance provides background on relating a flat drawing to a chosen viewpoint; the frame still needs close observation.
Connect the bridge and outside hinges
Place the bridge between the rims at the height shown by the reference. It should connect to the frame, not float inside the lens openings. Keep its width and curve simple until the larger spacing feels correct.
Locate one hinge on each outside edge. These are the origins of the two temple arms. Compare their positions before drawing the long backward lines. A neat rim full of highlights will not correct a hinge attached to the wrong part of the frame.
Attach two arms with coherent depth
Draw one temple arm from each outside hinge, following the visible direction and length. Show the curved ear tip only where you can actually see it. Let hidden sections disappear behind the front or the other arm instead of drawing through solid frame pieces.
Count the structure before shading: two rims, one bridge and two temple arms. Nose pads and small hardware may be visible, but they should not create a third long arm. Keep the supporting surface and any contact points consistent with the open glasses resting on the table.
Add thickness before glass effects
Refine the rim thickness where the reference shows it. A plastic frame may have a broader solid edge than a fine metal one. Keep thickness connected around the corners, avoiding random double lines that suggest broken pieces.
Leave most of each lens light. Add only a few pale reflection shapes or gentle value changes if they are useful. Do not fill both openings with uniform dark gray unless the reference actually shows tinted lenses. The frame should remain the clearest part of the study.
Finish with a restrained shadow check
Add small contact and cast shadows according to the reference light. Avoid a dark halo around the whole object. If a temple arm is raised, observe how its shadow separates from the table rather than attaching a thick line beneath every section.
Finally, cover the reflections and inspect the frame alone. The rims should align in the chosen view, the bridge should connect them and both arms should have a clear origin. For another connected-object study, try drawing scissors by their gaps.