Drawing / Intermediate
Draw a Woven Basket: Let the Weave Follow the Form
Establish the basket opening and broad values, then use a few curved weave bands instead of covering the object with a flat checkerboard.
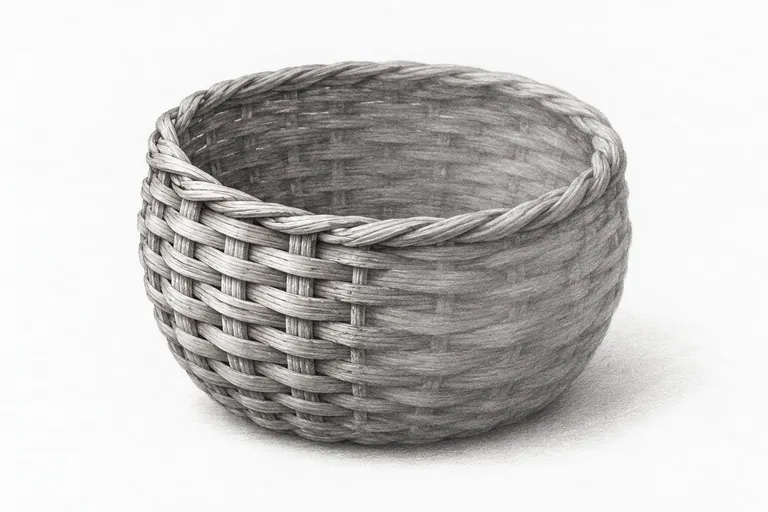
The basket must work before the weave
Place a small woven basket on a plain surface and choose a viewpoint where its opening is visible. Draw the main outside shape, the opening and the base lightly. If the body is tapered, compare the widths at several heights instead of turning it into a straight-sided cylinder.
The weave belongs to that volume. A neat grid drawn over an uncertain silhouette usually makes the uncertainty more noticeable. Spend the first part of the session on the shape even if the texture is what attracted you.
Separate the opening from the front wall
Compare the front rim with the back rim. Look for a thickness change, an overlap or a small inside shadow that helps explain the opening. The near and far edges do not need equally dark outlines.
Block in a broad value for the inside and another for the shaded side if your lighting supports that difference. Use light hatching, keeping room to adjust the drawing. Canson's hatching guidance supports building tone through lines; your basket's actual construction determines where the woven strands run.
Map only a few bands
- Choose three crosswise paths. Observe how they bend across the body. The spacing may appear to compress as the surface turns away.
- Add a few lengthwise paths. Follow the object's surface rather than drawing equally spaced vertical stripes across the whole page.
- Suggest intersections selectively. In one focal patch, indicate which strand passes over and which disappears underneath. Copy the weave you see; not every basket uses the same pattern.
- Let quiet areas stay quiet. Reduce the number and contrast of marks outside that focal patch. Broad shading can carry the rest of the form.
Use broken marks to avoid a wire cage
A continuous dark line from one side to the other may look like a metal rib rather than a woven strand. Break a few paths where highlights, overlaps or pale material interrupt them. Make those interruptions purposeful rather than randomly dotted.
Reserve your sharpest darks for a few recesses and overlaps. If every intersection receives the same black square, the texture can read as a printed pattern. The study needs enough information to suggest construction, not a census of every crossing.
Compare texture with value
Look from farther away. Can you see the opening and a turning body before the individual marks? If not, set the drawing aside and make a second basket using only three value masses. Compare the two before deciding what weave detail to keep.
A flat checkerboard: revisit the curved band directions. A heavy rim: compare front and back contrast. A furry surface: use fewer, longer decisions instead of repeated scratch marks. Correct one issue in a new small attempt rather than trying to repair every crossing.
Transfer the method carefully
Try the same large-to-small approach on a woven mat or handle, but observe the different structure. A flat mat and a curved basket body do not need the same spacing or directional changes. Keep observation ahead of the pattern you expect.