Watercolor / Beginner
Paint Bare Winter Branches: Taper, Direction and Open Spaces
Build a small leafless tree from a few main limbs, then add restrained branch tips without turning the crown into a tangled web.
Read the tree before the twigs
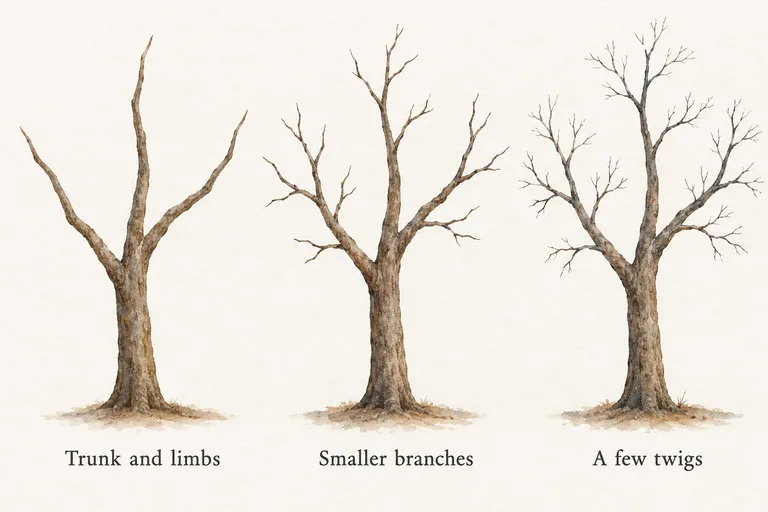
Choose a leafless tree from life or your own photograph. First follow the trunk upward with your eye. Find a few large limbs and the spaces between them. Notice whether the crown leans, spreads widely or grows mostly upward. Those decisions matter more than reproducing every twig.
Use watercolor paper, a pointed round brush and a familiar brown or blue-brown mixture. Test the mixture on scrap. A single color is enough to practise the structure; complex bark colors can wait for another session.
Test a tapering stroke
On dry scrap paper, begin a short stroke with moderate contact, then reduce pressure and lift toward the tip. Try a few brush loads. Too much liquid can leave a bead at the end, while too little may produce broken marks. Neither result is a universal failure, but a controlled taper is the target here.
Turn your paper if that makes the movement easier. You do not need to hold an awkward wrist position to prove you can paint a branch. Make each test large enough to see where the stroke narrows.
Paint the main structure
- Place the trunk. Use a light pencil guide if helpful, keeping it faint beneath the transparent paint.
- Choose three main directions. Follow the reference instead of giving every fork the same angle.
- Connect the limbs. Keep each smaller branch generally narrower than the structure supporting it.
- Leave open gaps. Pause before filling the crown with additional lines.
Canson's tree demonstration starts by observing and sketching the major forms before developing trunks and branches. This smaller exercise applies that broad-to-small sequence to a bare tree rather than copying the full landscape demonstration.
Add fewer secondary branches
Choose the branches that describe the silhouette or explain a major change of direction. Let some disappear behind others. Avoid treating the tree like a repeated symbol with an identical fork at the end of every limb.
Where a wet connection spreads more than you wanted, leave it to dry before adding nearby detail. Repeatedly touching a damp junction can make a thick blot. On your next test, compare a slightly less loaded brush or wait for the connecting stroke to dry.
Use a stopping test
Set the painting at arm's length. Can you read the tree's main direction and see clear gaps through the crown? Add only a few fine tips where they improve that reading. The exercise is complete when the structure is understandable, even if many real twigs remain unpainted.
A small ground-contact wash can anchor the trunk if your reference needs it. Keep that wash secondary to the branch study. For a second version, paint the same tree at half the size and reduce the number of tips again.
If all your branches have equal thickness, practise lifting the brush on scrap before another full tree. If the crown looks crowded, choose fewer secondary branches next time. Continue with the round-brush control lesson to isolate pressure and lifting movements.