Watercolor / Beginner
Make a Watercolor Paper Chain: A Christmas Painting Activity for the Family
Paint simple patterns together, let the paper dry, then turn the sheets into a lightweight Christmas chain with a shared color palette.
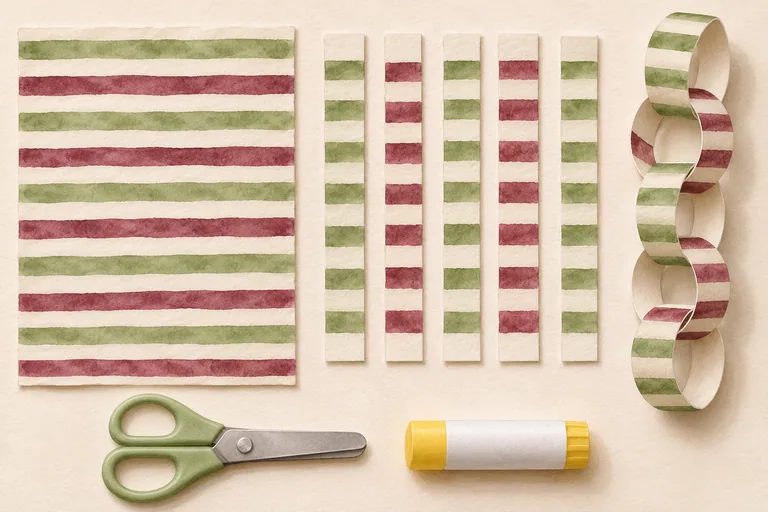
Give everyone one part of the same decoration
A paper chain lets several people contribute without needing to paint the same way. One person can make stripes, another dots and another simple leafy strokes. A shared palette ties the different marks together. Keep the activity to one short chain first so you can test the paper and joins before making a room-length garland.
This LUREXEN version uses watercolor patterns and a dry assembly stage. Michaels also offers a painted-paper-chain activity; its materials and process differ. The measurements and task split below are our suggested starting point, not instructions copied from that class.
Choose paper that bends into a loop
Use flexible drawing or mixed-media paper that accepts a light wash, washable watercolor paints, a brush, water, scrap paper, scissors and a paper glue stick or suitable paper adhesive. Very thick watercolor paper may resist bending. Thin printer paper may buckle with much water. Test one strip before committing a whole sheet.
For young children, an adult should choose age-appropriate materials, supervise cutting and handle any difficult joins. Keep drinks separate from paint water. Plan tabletop decoration rather than placing paper near candles, heaters or other heat sources.
Paint large patterns with limited water
Choose two main colors, such as sage and burgundy, and keep some unpainted paper visible. Paint broad stripes, spaced dots or short repeated brush marks across the sheet. Patterns do not need to line up perfectly. Avoid heavy soaking: the sheet only needs enough color to look lively when bent into loops.
Keep paint away from the areas you will use as joining tabs if possible. The underside may remain unpainted for a lighter look. If you want color on both sides, let the first side dry before turning the sheet over. Do not cut or glue wet paper.
Dry, flatten and cut a small test set
Leave the sheet flat until it is completely dry. If it curls, place it under clean dry paper and a flat weight once dry. Mark strips about 2 cm wide and 15 cm long as an initial test. A 1 cm overlap makes a small loop; adjust strip length if your paper needs a looser bend.
Cut five strips first. Keep the strip edges reasonably parallel, but a small handmade variation is fine. Younger participants can sort the dry strips or choose the color order while an adult cuts.
Link the loops in a real chain
Bring the ends of the first strip together with a short overlap and glue the join. Hold it according to the adhesive instructions. Thread the next flat strip through the first completed loop before joining its ends. Continue one loop at a time. Neighboring loops will naturally turn in different directions.
Never join all the strips into separate rings first: closed rings cannot pass through one another. If a join opens, allow more setting time or use a paper adhesive suited to the surface. Do not add more wet glue until the paper becomes soggy.
Share the work and display lightly
Invite each person to choose one favorite loop and say what they liked making. Add more links only after the test chain holds together. Use a small chain on a shelf or as a table decoration, and use fixings suitable for the surface if hanging it. Keep it away from heat and moisture.
For a countdown variation, make only the number of links you need and remove one per day. For another family session, visit the free lesson library and choose a small drawing or painting everyone can interpret differently. No purchase is needed for this activity.