Watercolor / Beginner
Paint a Snow Globe Christmas Card with One Simple Pine
Use a clear circular silhouette, a small snowy tree and a few reserved highlights instead of outlining every glass edge.
Keep the scene small and readable
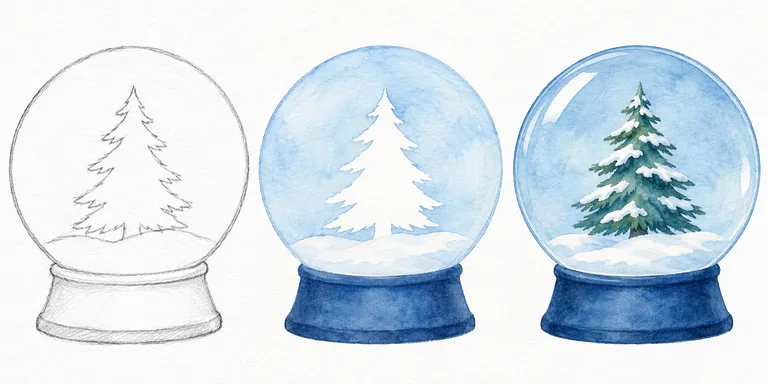
A snow globe can become crowded quickly. Begin with one evergreen tree, one snow bank and a plain base. Choose watercolor paper, pencil, a round brush, blue and green paint, and a small amount of a neutral dark. Sketch a practice version before using your final card.
Lightly draw a circle and place a short base underneath it. Keep the base centered. Allow space around the circle so your greeting and the edge of the card do not compete with the glass.
Save the snow before adding color
Mark a low curved snow bank inside the globe. Draw the pine as a loose tapering shape with uneven branches. Reserve a few broad white gaps across those branches. These are snow patches, so make them different lengths rather than a regular striped pattern.
Add a pale interior wash
Paint a very diluted blue inside the globe, working around the snow bank and selected tree gaps. Keep a narrow white highlight near one side of the circle. The blue represents a stylized cool interior, not a solid blue ball. Let the wash dry before painting the tree.
If a white patch gets lost, leave the first attempt as a study. Trying to rub a large area back to pure white can damage the surface. A fresh small version is often more useful than repeated repair.
Build the tree and base
Paint the tree with a light green, leaving the planned snow patches open. When dry, add a few darker branch marks mainly beneath those patches and near the trunk. Give the base a simple blue wash and a darker lower edge. Keep its top and bottom curves consistent.
Suggest the glass with two short pale blue arcs and the reserved highlight. Avoid tracing a heavy dark line around the complete circle; it can make the globe look cut from opaque paper.
Finish at card distance
Set the study at arm’s length. Check that the tree stays inside the globe, the base supports it and the snow remains the lightest area. If you want falling snow, reserve a few tiny white spaces in your next version. Keep the greeting outside the circle and add it only on dry paper.