Coloring / Beginner
Make Gold Look Shiny with Ordinary Colored Pencils
Use pale highlights, warm middle colors and a few dark reflection bands to suggest gold without metallic pencils or glitter.
Choose a simple gold-colored object
A bell, a plain bauble fitting or a broad decorative ribbon clasp can make a useful small study. Choose an outlined object with enough open space to show more than one value. Tiny filigree is a difficult place to learn the effect because there is little room for a clear highlight and shadow.
Use ordinary pale yellow or cream, ochre and a dark warm brown pencil. A light neutral pencil is optional. These materials create an illustration of reflective gold; the surface will not become physically metallic. You do not need foil, glitter or a special gold pencil for this exercise.
Plan the light area before filling the shape
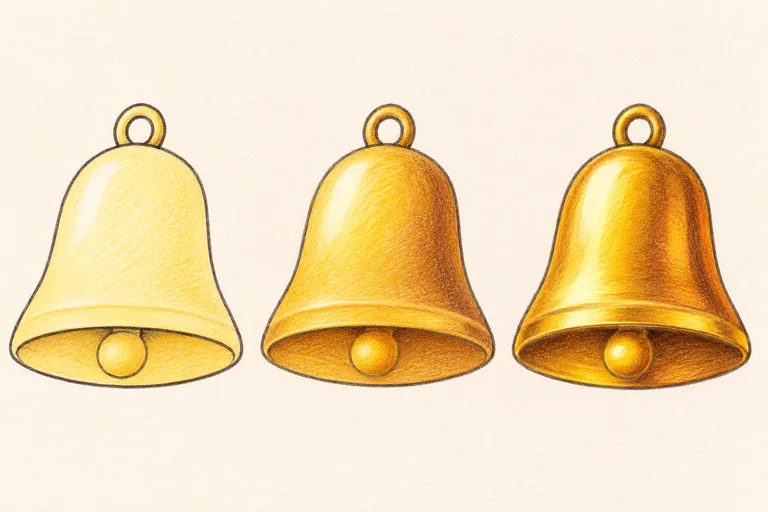
Observe a reference with a simple reflection pattern, or use the illustrative bell above as a starting idea. Decide where the broadest light area belongs. Leave that area pale from the beginning. On a convex bell, a highlight can curve with the body rather than appearing as an unrelated straight stripe.
Do not assume that every gold object has the same bands. The surroundings and viewpoint affect reflections. This practice uses a simplified pattern to explore value contrast, not a universal map you must put on every metal object.
Lay down the warm middle color
Apply pale yellow lightly to the body, keeping the planned highlight almost untouched. Add ochre to the turning areas in a second gentle pass. Keep the first layers open enough to adjust the shape of the light area after you see the whole object.
Compare the object with the rest of the coloring page. If the surrounding scene is already very warm, the light highlight and darker accents will matter more than making the yellow brighter. More saturated color alone does not explain a shiny surface.
Place dark and light close together selectively
Add a narrow warm-brown accent next to part of the lighter area, following the form. Use other darker notes where the reference shows a rim recess or the underside of the bell. Keep the contrasts strongest in a few places rather than surrounding the whole shape with a heavy brown outline.
Work in short sections and compare each addition before continuing. A smooth, even yellow-to-brown gradient can suggest a rounded matte object. A more distinct change between a pale reflection and a darker neighboring band can make the surface appear more reflective. Keep both effects under control.
Keep the construction visible
The bell still needs a believable rim, opening and attached clapper. Follow the printed shape and avoid allowing a reflection band to resemble a cut through the object. On a clasp or fitting, preserve the connection to the object it belongs to.
Keep surrounding shadows consistent with the scene's light direction. A shiny surface may contain complicated reflections, but the object should still occupy one clear position. Do not use black everywhere to force contrast if it hides the outline and removes all warm middle color.
Judge the illusion without expecting real shimmer
Look at the finished study from a distance. You should see a gold-colored form with a clear pale reflection, warm body color and selected dark accents. Tilt the paper if you want, but ordinary colored pencils will not reflect like actual metal. The effect comes from the drawing.
Repeat the same outline with gentler contrast to see how it becomes more matte. This is a useful comparison before coloring a full festive scene. For a separate graphite construction exercise, see drawing a bell with reflection bands; keep the color decisions in this lesson distinct from its pencil-value study.