Coloring / Beginner
Color Soap Bubbles with Pencils: Broken Edges and Small Rainbow Accents
Keep a bubble’s center related to its background, then suggest the thin surface with a few pale reflections and restrained colored arcs.
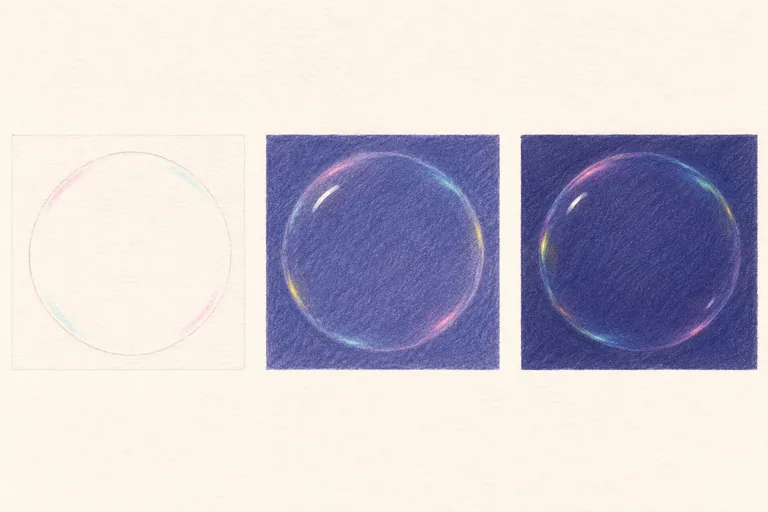
Start with one small circle
A soap bubble can look like a solid marble when its center is filled with a bright rainbow. For this exercise, let the background remain visible through the middle and concentrate on a few surface reflections. One small bubble is enough to test the idea.
Use colored pencils, white drawing paper and a light graphite pencil. A pink, a blue or cyan, a pale yellow and a dark blue-violet make a useful test selection; a white pencil is optional. The illustration is an AI-generated explanation, not a photographed pencil test. It shows one possible color arrangement rather than a fixed pattern every real bubble must have.
Choose the paper setup deliberately
Sakura's official bubble exercise uses black paper, erasable colored pencils and optional pen highlights. Our practice below starts on white paper and builds a small colored background. These setups behave differently, so do not assume an ordinary pencil will erase or cover a dark surface like the products in another tutorial.
Keep your background area modest, about a few centimeters across. Test your white pencil over a dark sample if you plan to use it. If it does not cover strongly, reserve the brightest marks as untouched paper instead of expecting white to repair a fully darkened highlight later.
Plan the background through the center
Sketch a faint circle inside the small study area. Decide where one short pale reflection will sit and keep it light. Build a quiet blue-violet background both outside the circle and through most of its interior, using similar layers.
The circle should not become a completely separate filled disk. Small variations can remain, but the broad background needs to feel continuous. On a printed coloring page, a heavy black circular outline will stay visible; use your own faint circle or a suitable light outline for this transparent effect.
Add separated color accents near the rim
Place short pink, cyan and pale-yellow arcs near selected parts of the circumference. Let some overlap softly and leave other stretches much quieter. Follow the curve rather than drawing straight colored stripes across the bubble.
Keep the marks narrow enough that the center still reads as open. A full ring of equally bright colors can make the rim look like a rigid hoop. Try reducing one or two sections in the next study rather than strengthening every part to the same intensity.
Use a small number of reflections
Add the reserved pale reflection near one upper side. A much smaller, weaker accent elsewhere may be enough to balance it. Compare an actual bubble photograph if you want a particular reflection pattern; the surrounding light changes what is visible.
A white pencil can soften or lighten selected marks if your material test supports it. Avoid repeated hard pressure over the whole circumference. The image should depend on the relation between the dark background and the small light accents, not on covering the entire surface with white.
Check transparency before adding more bubbles
Step back and ask whether the background appears to continue through the circle. If the center looks lighter and uniformly colored like a solid ball, compare another study with less interior color and fewer continuous rim marks. A floating bubble does not need a contact shadow beneath it.
Once the first study reads clearly, try a smaller second bubble with a few weaker marks. For help building a quiet surrounding area, see the soft colored-pencil background lesson. The related coloring workbook provides other scenes for pencil practice; check its actual previews, since this bubble exercise is a separate free lesson.