Beginner / Christmas studio
How to Draw a Christmas Gift Box: Perspective, Ribbon and Pencil Shading
Draw a wrapped Christmas gift in pencil. Build the box first, carry the ribbon across its planes and use three values before adding a simple bow.
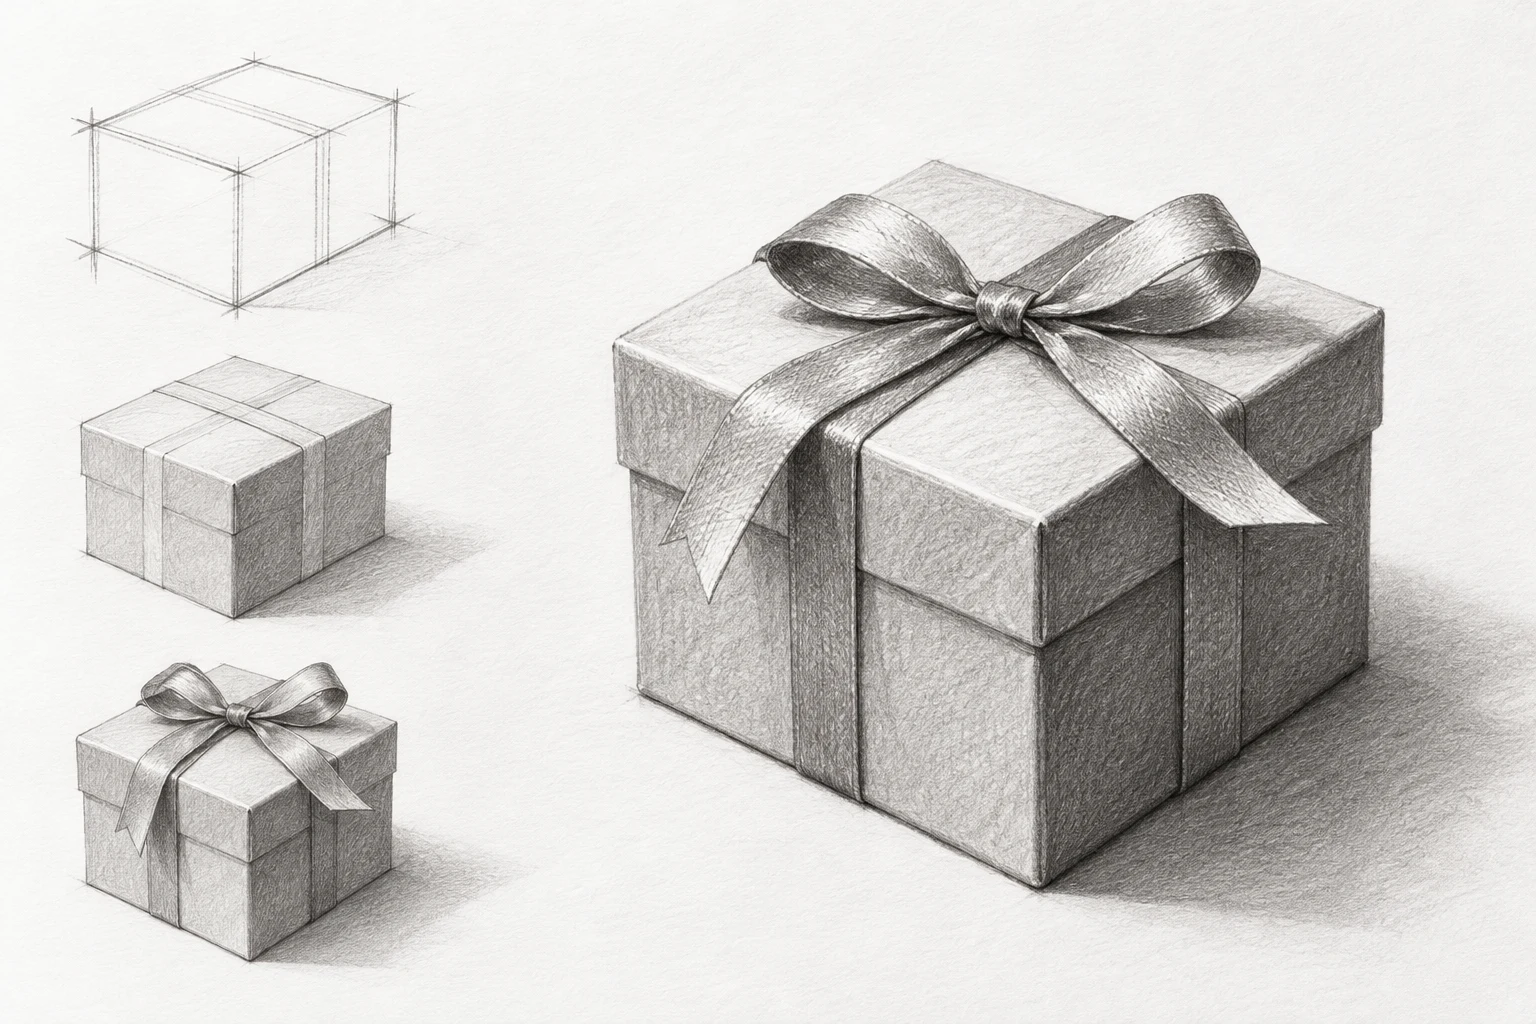
One focused seasonal study.
Keep the first attempt small enough to repeat. Your own subject, paper and materials are the reference.
- Level
- Beginner
- Practice time
- 20–30 minutes
- Skill focus
- Box construction, overlapping ribbon and three-value shading
- Success looks like
- Draw a gift whose box feels solid and whose ribbon follows the same surfaces rather than floating above them.
Materials
- Plain drawing paper
- An HB pencil and an optional softer pencil
- An eraser
- A small plain box wrapped with a narrow ribbon
- One steady lamp; a ruler is optional for checking
Draw a gift whose box feels solid and whose ribbon follows the same surfaces rather than floating above them.
Choose a view with three readable planes
Put a small gift box on a table and sit where you can see the top and two side faces. Keep the box, chair and lamp in place during the study. A plain package is easier to understand than busy patterned paper, so make the first drawing without stars, lettering or glitter.
Mark the highest point, lowest point and overall width. Notice which corner is nearest to you and how much of each face you can see. Draw a light envelope around the object. These measurements establish the subject you actually see; they are more reliable than starting with a perfect square from memory.
Construct the box before the wrapping
Place the nearest vertical corner and then the two visible side edges. Compare the direction of the top edges with a horizontal paper edge. If you are using a conventional level, two-point setup, the edges receding to the left belong to one shared vanishing direction and the edges receding to the right belong to another. They should not each aim at an unrelated point.
Your observed box may sit on a slightly different tilt, so do not force a textbook diagram over it. Check the whole top plane as a connected shape, then check each visible side. Keep construction strokes light. If the box feels twisted, correct an edge relationship now; a shaded bow will not repair inconsistent underlying planes.
Carry the ribbon across the same surfaces
Think of the ribbon as a band resting on the box. Draw its two boundaries across the top first. At an edge, turn both boundaries onto the adjacent face so they meet that corner together. The apparent width may change as the band moves away from you; do not assume every visible segment has the same width on the page.
Add the second crossing band only after the first makes sense. Where the bands overlap, decide which one is above and interrupt the lower boundary appropriately. Avoid drawing every hidden line through the upper band. A small overlap cue explains the wrapping more clearly than a heavy outline around every strip.
Build a simple bow from folded shapes
Mark a small knot where the bands cross. Treat the two loops as folded ribbons, not two identical ovals. Observe the outer shape of each loop and the smaller opening inside it. Let the far loop be partly hidden if that is what your reference shows.
Add one or two tails with clear attachment to the knot. Keep their direction simple for the first study and use a single fold to suggest thickness. If the bow overwhelms the box, compare its width with the package width before adding more curves. You can leave the bow as a lightly described shape while practicing the more important box structure.
Separate the planes with three values
Squint at the subject and choose a light, middle and dark group. With a lamp above the left, the top may be the lightest plane while one side is darker; observe your own setup rather than copying this arrangement automatically. Lay down a quiet, even value with light strokes and reserve the brightest ribbon touches as paper.
Use a small darker accent beneath a ribbon overlap, inside a loop or where the box touches the table. Place a cast shadow consistent with the lamp, not an arbitrary gray halo. Keep enough of the large planes quiet that the object still reads at a distance. Blending is optional; orderly pencil strokes can describe a complete study.
Check the structure before festive pattern
Make a second ten-minute drawing beside the first. Spend four minutes on the envelope and planes, three on the ribbon route and three on broad values. Change just one measured relationship, such as the top-plane depth or the bow's width. Compare both drawings with the same unmoved box.
Only then try one small pattern or a short tag. A pattern should follow the surface rather than ignore it: let marks turn with each plane and become partially hidden by the ribbon. If the decoration makes the structure harder to see, remove it from the next attempt. The successful exercise is a clearer solid package, not the largest number of festive details.
Change one decision, not everything.
Common mistakes
The top looks twisted
Recheck the linked edges and their receding directions before shading.
The ribbon floats over the package
Connect its boundaries through the corners and show a deliberate overlap.
The bow looks like two symbols
Observe unequal outer shapes and the openings inside the folded loops.
Every face has the same darkness
Separate broad values before small decorative marks.
Think it through
Try answering these questions in your own words, then open each answer to compare. Use the self-check below to review your actual study.
How can I stop the ribbon from floating above the box?
Connect its boundaries through the corners and show a deliberate overlap.
Practice step: The ribbon floats over the package
How can I separate the box planes with value?
Squint at the subject and choose a light, middle and dark group. With a lamp above the left, the top may be the lightest plane while one side is darker; observe your own setup rather than copying this arrangement automatically. Lay down a quiet, even value with light strokes and reserve the brightest ribbon touches as paper.
Practice step: Separate the planes with three values
Review your own study
Tick what you can observe in your work. If a point is unclear, open its practice reminder. Choose one point to focus on next.
Tick a point only when you can observe it in your study.
Choose one focus for your next attempt using the circle beside a point.
This is your own reflection, not an assessment of your artwork. Choices are not saved or uploaded and reset when this page reloads.
Further learning and source context
This is an original LUREXEN exercise. These manufacturer education pages support general material, value or perspective decisions; they do not document the exact study pictured above. No publisher artwork was reused.