Drawing / Beginner
Winter Solstice Drawing: Study a Long Shadow with One Light
Use a simple object and one low lamp to observe a long cast shadow, keeping its direction separate from the shading on the object itself.
Use the season as a reason to look
The December solstice falls on December 21 in 2026. It marks the winter solstice in the Northern Hemisphere and the summer solstice in the Southern Hemisphere. For a northern winter sketchbook, it is a useful occasion to notice low light and long shadows. You do not have to wait for the date or work outdoors to practise the observation.
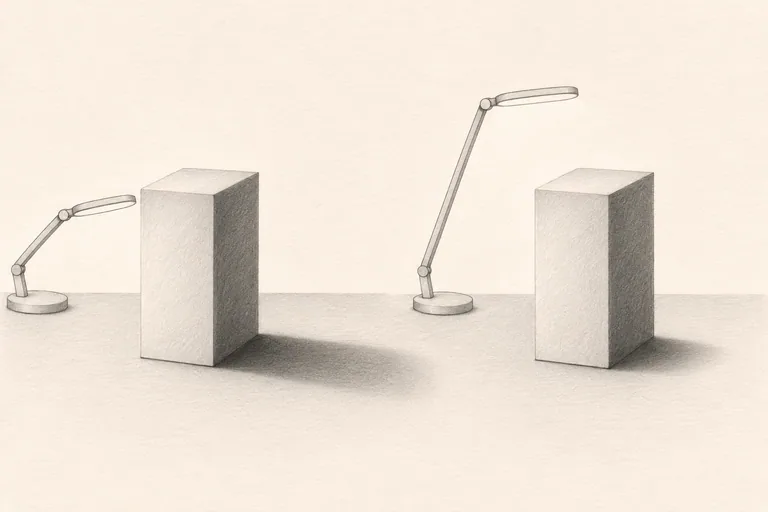
Place a plain upright block or small cardboard box on a pale sheet of paper. Use one stable desk lamp to the side. A cool-running LED lamp is convenient; follow its instructions and keep paper clear of the fixture. Use ordinary drawing paper and an HB pencil. Keep your seat, object and light position fixed during each study.
Trace the direction with your eyes
Look from the base of the object toward the far end of its shadow. In this simple setup, the shadow extends away from the light across the paper. Lightly mark that direction before drawing its complete edge. Compare its length with the object’s height as seen from your viewpoint; measure the observation rather than applying a universal ratio.
Start with a simple box if a curved object creates too many changing edges. Different room lights can create more than one shadow. Turn the competing lights off when practical, or choose a setup with one clearly dominant shadow instead of forcing several shapes into one.
Separate three jobs on the page
First draw the object’s outline. Next draw the shadow’s broad footprint on the table plane. Then decide how the object itself turns from light into shade. The shadow on the table and the shaded side of the box are connected by the lighting, but they are different shapes on different surfaces.
Mark the contact point where the object meets the paper. A small dark accent there can anchor it. Compare the shadow edge close to the base with its edge farther away. Its softness depends on your light source and setup; record what you see rather than automatically blurring the whole shape.
Change the lamp once
Make a second small drawing beside the first. Keep the object still and raise the lamp, taking care not to move the paper. Observe whether the shadow becomes shorter and how its footprint changes. If it does not change as expected, check whether the source also moved sideways or whether another light is dominating.
Label the two drawings with your actual lamp positions in your own words. Do not write guessed angles or scientific measurements. The comparison is a looking exercise, not a calibrated model of the Sun.
Bring the observation back to winter subjects
Use the same separation of object, contact and cast shadow when drawing a fence post, a small snow-covered wall or a plant pot near a window. Outdoor shadows cross uneven ground and may pick up reflected light, so do not copy your indoor box shadow as a formula for every scene. For a quieter value exercise, try three-group value massing. The generated illustration shows one simplified arrangement, not a recorded lighting experiment.