Beginner / Studio practice
Mix Gray Watercolor with Ultramarine and Burnt Sienna
Make a five-step warm-to-cool mixing strip, then separate hue from dilution. Use your own ultramarine and burnt sienna to find a useful gray.
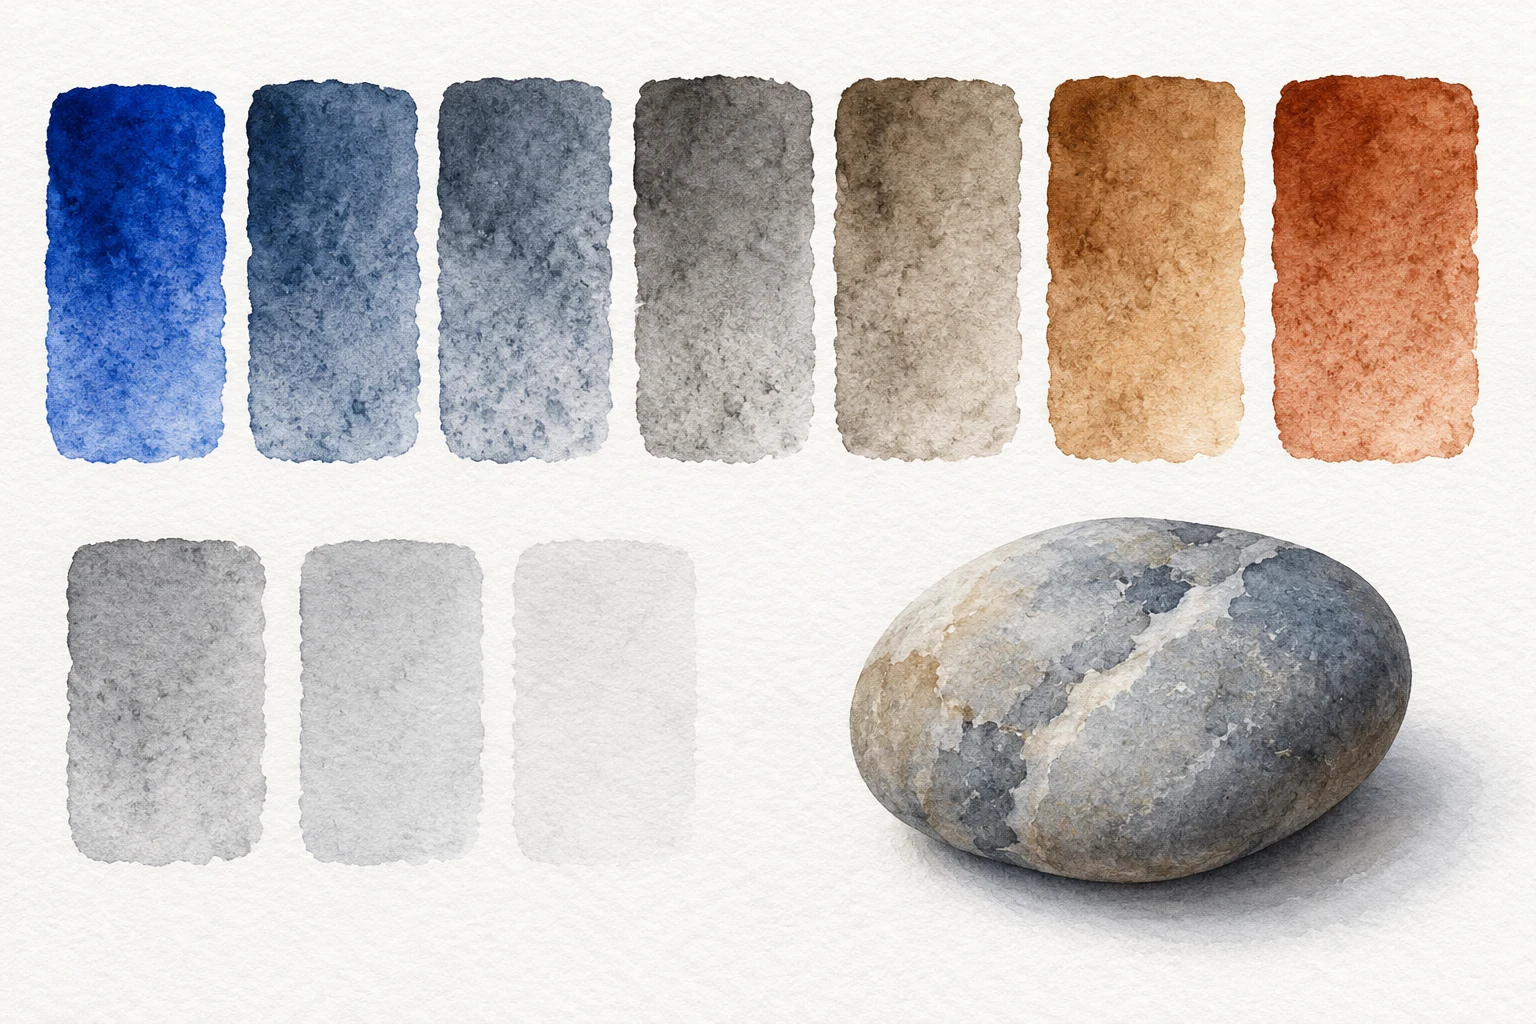
One focused, repeatable study.
Keep the first attempt small enough to repeat. Your own subject, paper and materials are the reference.
- Level
- Beginner
- Practice time
- 25–35 minutes, plus drying
- Skill focus
- Neutralizing balance, warm/cool shifts and value control
- Success looks like
- Find a useful gray between two colored mixtures and paint it at three strengths without changing the pigment balance.
Materials
- Ultramarine blue and burnt sienna watercolor
- Watercolor paper, a brush and two clean mixing areas
- Water, a cloth and a pencil for pigment notes
- A small gray object for an optional observation study
Find a useful gray between two colored mixtures and paint it at three strengths without changing the pigment balance.
Define a useful gray rather than a perfect formula
Ultramarine and burnt sienna can neutralize each other into a range of subdued mixtures. The source by Jane Blundell below describes that pairing. Your particular paints may differ in pigment composition, strength or texture, so an equal-volume recipe is not a dependable starting promise.
For this study, a useful gray is a mixture that reads noticeably less blue or orange-brown than its neighbors. It does not have to be spectrally neutral. The exercise separates two decisions: changing the balance of pigments and changing the amount of water. Keeping those decisions apart makes corrections easier.
Make the endpoints and a middle attempt
Paint one small ultramarine swatch and one burnt sienna swatch with a gap for three mixtures between them. Keep their strength moderate so the differences remain readable after drying. Record the actual paint names or pigment codes from the labels.
In a clean mixing area, start with one color and add a little of the other. Test on paper rather than judging the puddle alone. If it still reads strongly blue, add a small amount of the earth color; if it has shifted too far toward brown, return toward blue. Make adjustments gradually.
Build five comparisons without chasing equal steps
Fill the strip with a blue-leaning mixture, a quieter central mixture and a brown-leaning mixture between the two endpoints. Aim for a clear comparison, not mathematically equal intervals. Mix enough of the central candidate to save for the next stage.
Let the strip dry before deciding which gray is useful. A wet puddle or a dark wet swatch can hide a color bias. If all three mixtures look alike, repeat them with more distinct balances rather than assigning different labels to nearly identical marks. Do not add a third pigment simply to force the middle swatch into agreement.
Change dilution while preserving the mix
Take the saved central mixture and make three small swatches beneath the strip. Use it at its current strength, then dilute a portion for the next swatch and dilute again for the lightest one. Keep the pigment balance the same.
This row tests value and concentration rather than three new gray recipes. If you add more blue to make a darker mark, both hue and strength change. That can be useful in a painting, but it answers a different question. Give the row a plain note such as stronger, medium and lighter once it is dry.
Apply the comparison to one quiet object
Choose a small gray pebble or another matte object you can observe. Lightly establish its overall shape and reserve its brightest passage. Use the light mixture for a broad plane, let it dry, and add a darker passage where the object turns away from the light.
Decide whether a blue-leaning or brown-leaning mixture better relates to what you see. Do not make every shadow cool simply because the strip offers a cool option. The object and lighting decide the relationship. Keep a cast shadow separate enough that you can compare it with the shadow on the form.
Diagnose before adding more paint
If the result is too blue, change the pigment balance in a test puddle. If it is too light but the hue is useful, adjust strength or plan a dry layer. If it is too busy, leave part of the next study simpler. These corrections address different problems.
Keep the dried strip as a record for that pair of paints. Granulation, opacity and lifting behavior are properties to test, not qualities to infer from the word gray. A premixed gray is also a valid option; this exercise is about understanding the choices, not proving that one way of working is more legitimate.
Change one decision, not everything.
Common mistakes
Equal amounts are treated as a universal recipe
Adjust small additions using a dried test strip.
More blue is added when the only problem is lightness
Separate color balance from concentration.
Every gray shadow is made the same temperature
Compare the object and its lighting before choosing the mixture.
Think it through
Try answering these questions in your own words, then open each answer to compare. Use the self-check below to review your actual study.
How can I compare warmer and cooler gray mixtures?
Fill the strip with a blue-leaning mixture, a quieter central mixture and a brown-leaning mixture between the two endpoints. Aim for a clear comparison, not mathematically equal intervals. Mix enough of the central candidate to save for the next stage.
Practice step: Build five comparisons without chasing equal steps
How can I change dilution without changing the pigment balance?
Take the saved central mixture and make three small swatches beneath the strip. Use it at its current strength, then dilute a portion for the next swatch and dilute again for the lightest one. Keep the pigment balance the same.
Practice step: Change dilution while preserving the mix
Review your own study
Tick what you can observe in your work. If a point is unclear, open its practice reminder. Choose one point to focus on next.
Tick a point only when you can observe it in your study.
Choose one focus for your next attempt using the circle beside a point.
This is your own reflection, not an assessment of your artwork. Choices are not saved or uploaded and reset when this page reloads.
Further learning and source context
This is an original LUREXEN exercise. The sources below provide material or concept context; they do not document the exact study pictured above. No publisher artwork was reused.
- DANIEL SMITH / Jane Blundell: Mixing colors with Jane’s Grey watercolor ↗ — Primary explanation of the ultramarine and burnt-sienna pairing. The comparison strip and object exercise are original LUREXEN practice.
Paint a Clear Glass in Watercolor: Highlights, Shapes and Edges
Paint a plain glass tumbler by observing background shapes, reserved highlights and selective dark accents. Keep transparency without a heavy outline.