Watercolor / Beginner
Paint Watercolor Grapes: Pale Highlights and Transparent Layers
Build a small grape cluster with light first washes, dry layers and a few overlap accents instead of outlining every fruit.
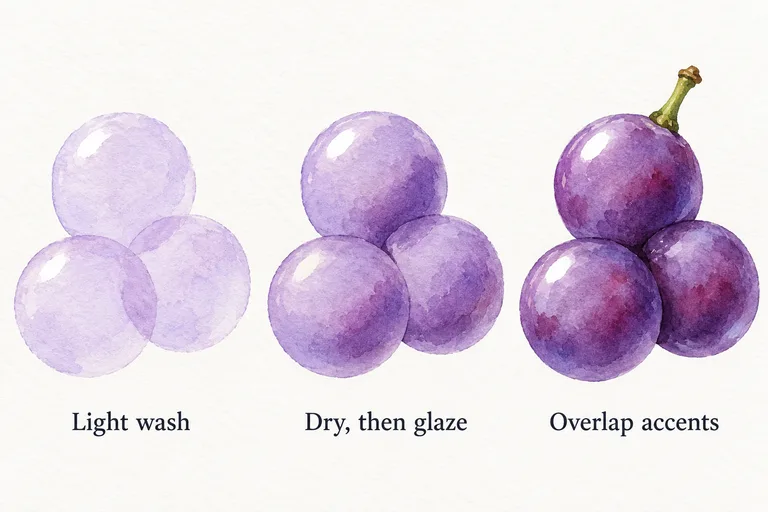
Start with three grapes, not a whole bunch
A full bunch creates many decisions at once. For this study, choose three grapes that overlap clearly in your own photograph or a small still life. Look for one in front and two partly behind. Draw their visible outlines lightly, allowing slight differences in size instead of making three identical circles.
Use watercolor paper, one familiar purple mixture and a round brush with a usable point. Keep scrap paper nearby. The purpose is to separate light, midtone and a small dark accent, not to reproduce a specific grape variety or match the digital example exactly.
Reserve a small light area
Decide where the light comes from. In the example it is upper left, so the light areas sit toward that side. Leave a little unpainted paper where you see a highlight. A softer pale patch may suit a dull skin better than a sharp white dot; observe your reference before choosing.
Paint each grape with a diluted wash. Where two shapes touch, let one dry first if you want their boundary to stay separate. If both are wet, the paint may flow between them and merge the shapes. That can be useful elsewhere, but it complicates this first comparison.
Add a dry second layer
- Wait for the first wash to dry. The surface should no longer show a wet sheen. Allow more time if you are unsure.
- Test the next wash. On scrap, place a light layer over a dry patch of your first mixture. Check that it deepens the value without immediately becoming too dark.
- Glaze the shadow side. Add a smaller wash toward the lower right, leaving much of the upper-left area lighter.
- Stop and compare. Let the grapes dry before deciding whether any needs another pass.
Derwent distinguishes layering on a dry first wash from working into a wetted surface. This exercise uses the dry approach to keep the shadow shapes easier to place.
Use overlap accents sparingly
Look at the place where one grape covers another. Add a short dark accent only where the reference supports it. Do not draw a dark ring around every grape. A few firm contacts, together with quieter boundaries, can make the cluster easier to read.
Finish with a simple stem after the fruit dries. Keep it secondary. If you add a cast shadow, observe its direction and softness rather than putting the same dark oval under every fruit.
Troubleshoot the next attempt
The grapes look flat: compare your dry light and shadow values. The cluster looks outlined: shorten the contact accents next time. The color looks disturbed: the underlayer may have been damp, or repeated brushing may have moved it. Test a lighter touch on scrap.
Try a second cluster with the same palette and fewer marks. Compare the two from arm's length. Continue with the glazing lesson if you want to isolate the layering skill before painting more fruit.