Watercolor / Beginner
Paint a Watercolor Plaid Card: Clean Crossings, Soft Handmade Lines
Build a small festive plaid with two transparent colors, dry layers and generous white gaps before turning it into a card or gift-wrap accent.
Start with a small repeat
A painted plaid can make a personal holiday card without a complicated drawing. The useful challenge is keeping the spaces readable where stripes cross. This exercise uses a simple original repeat rather than reproducing a named tartan. Prepare watercolor paper, a medium flat or round brush, two transparent colors and clean water. A muted red and a green work well, but blue and ochre also make a useful test.
Draw a rectangle about 10 cm wide on a scrap sheet. Leave the outer edge unpainted so you can handle the paper. Mix a small puddle of each color before starting; repeatedly remixing a stripe can make the same band change strength halfway across.
Lay the first direction
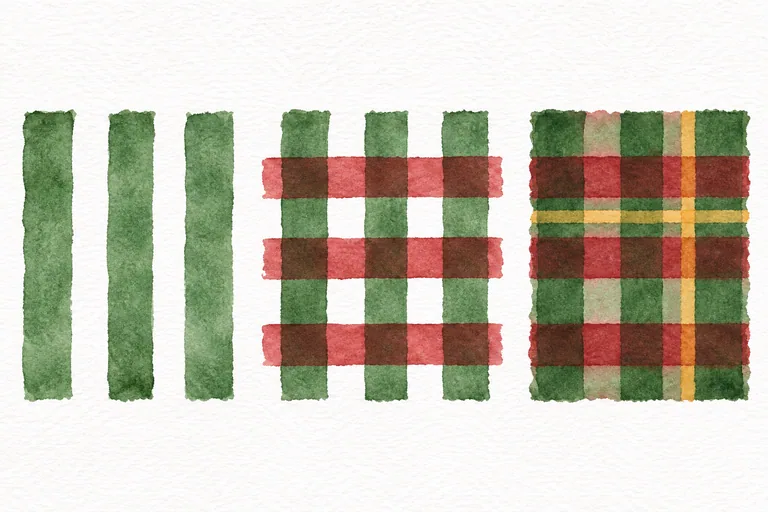
On dry paper, paint three broad vertical stripes with one diluted color. Leave white gaps roughly as wide as the stripes. Pull each stroke once, then refill the brush before the next stripe. A slight wobble is fine. Returning to a partly drying edge is more likely to create a distracting mark than improve the line.
Let this layer dry fully. Check it in normal light rather than assuming it is dry because the surface has lost its shine. If you are unsure, test a spare swatch made at the same time.
Cross the dry bands
Paint three horizontal bands in the second diluted color. Use light pressure and avoid scrubbing across the earlier stripes. Transparent layers will usually make the crossings darker; the exact mixed color depends on your pigments. If the two colors make a dull crossing, try a paler second wash on your next swatch.
Compare one band painted across a fully dry swatch with one painted while the first wash is still damp. The damp version may spread or mix at the edges. Keep both tests, but choose the dry-layer approach when you want separate bands.
Add one accent, then stop
Once the second layer is dry, add one narrow ochre line beside a broad band. Repeat its position consistently instead of putting fine lines in every gap. Keep some white paper visible. Too many accents can remove the calm spacing that makes the plaid legible.
For a card, paint a separate small panel and mount it on a folded blank after drying. For wrapping, try a paper sleeve around a box rather than painting a large sheet immediately. Test that the dry paint does not rub off before putting it against another surface.
Check your result
- Can you follow each broad stripe through the crossings?
- Are there clear white gaps in both directions?
- Does the narrow accent repeat in one consistent position?
If the pattern feels crowded, repeat it with fewer stripes before changing your brushes. For more control over transparent overlaps, try the glazing lesson. The illustration is an AI-generated guide to the arrangement, not evidence of a physical paint test.