Watercolor / Beginner
Paint a Christmas Poinsettia with Overlapping Red Bracts
Separate a festive red plant into a few pointed shapes, then use dry layers to show which bracts sit in front.
Plan a small card study
A poinsettia makes a useful Christmas-card subject because its pointed red shapes read clearly at a small scale. The red parts are bracts, modified leaves surrounding the tiny central flowers. Use a plant or a photograph you have permission to study. Select one cluster rather than copying the whole pot.
Prepare watercolor paper, pencil, a pointed round brush, red, yellow and green paint. Test a pale red and a stronger red on a spare piece of the same paper. Keep your folded card separate until you are happy with the practice study.
Find the overlaps first
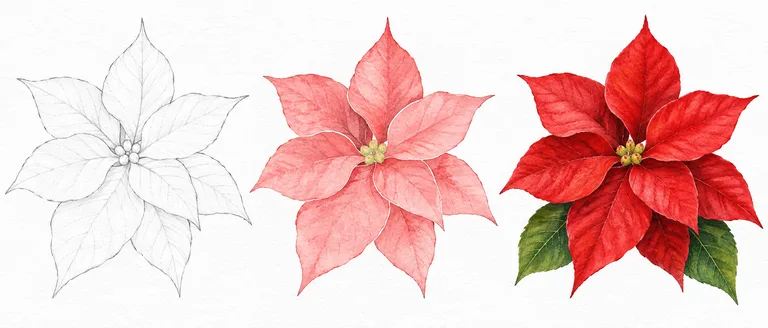
Mark a small center and draw five to seven broad pointed bracts around it. Vary their direction and length. Add two partial shapes behind them. Where one bract crosses another, stop the hidden edge instead of drawing through the upper shape. Check that every point has enough space to paint.
Paint separated pale shapes
Paint a pale red wash inside one bract. Leave a fine unpainted separation where neighboring shapes would otherwise merge. Work on a non-touching bract while the first dries. Small paper gaps help this beginner exercise stay readable; they do not need to outline the whole plant.
Let these washes dry completely. Water moving into a partly drying shape can leave an unwanted backrun, so avoid dropping in fresh water while trying to smooth a stubborn edge.
Darken only the recessed areas
Add a narrow stronger red layer near the base of selected bracts and beneath visible overlaps. Pull that layer outward with a damp, blotted brush if a softer transition is needed. Keep most tips lighter. Add two green leaves behind the cluster after the reds are dry, then suggest the center with a few small yellow marks.
Check before making the card
Look from a short distance. Can you identify a front bract without seeing every vein? If not, strengthen one overlap rather than adding dark lines everywhere. Leave room for your own greeting outside the plant. Try one smaller study with fewer bracts to see how much detail the final card actually needs.