Watercolor / Beginner
Paint a Pomegranate Half: Ruby Seed Groups Without Hundreds of Dots
Use pale membranes, grouped red shapes and selective highlights to suggest a rich winter fruit without painting every seed.
Use a reference and simplify it
A cut pomegranate brings a rich red accent to a winter sketchbook or a handmade food-themed card. Use your own fruit or a reference photograph you have permission to use. Look for the rind, the pale membranes and several groups of seeds. The number and shape of those compartments vary; you do not need a perfectly symmetrical star inside the fruit.
Set out watercolor paper, a small round brush, a warm red, a cooler red or violet, and a pale yellow or earth color. If you have only one red, change its dilution first. Keep a scrap of the same paper beside your study to test the darker mixture.
Reserve the pale divisions
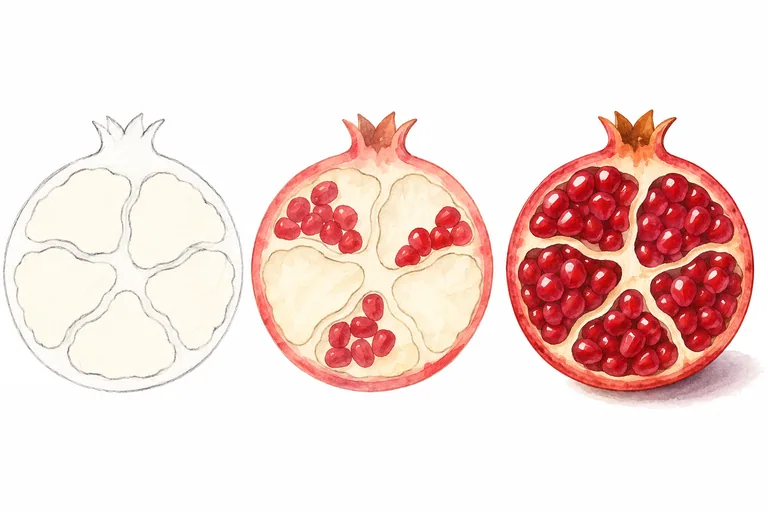
Sketch a slightly irregular circle for the cut face, then add the thickness of the rind. Mark a few broad membrane divisions inside. Keep those lines light. Paint the rind with a pale coral wash, and touch a very diluted cream mixture into selected membrane areas. Leave other light areas as paper.
Allow this first layer to dry before working close to the pale divisions. The cream areas are structural gaps, so do not cover them with an even red wash across the entire fruit.
Paint clusters before individual seeds
Place small connected red shapes inside one compartment, leaving tiny pale openings between some of them. Vary the shape and spacing. Continue around the fruit, keeping the membrane paths open. Avoid filling every opening or outlining each seed in pencil.
While the red is still wet in a small area, you can touch in a little cooler color on the shadow side. Work on one cluster at a time so you can judge moisture. If the mixture spreads across a membrane, let it dry rather than chasing it with repeated wet strokes.
Choose the few sharp details
When dry, add darker red in a few gaps and along the lower-right sides of selected seeds. Reserve tiny highlights on their upper-left faces if that matches your reference light. The highlights do not all need to be identical. Leave quieter clusters with fewer marks so the fruit does not become a uniform field of dots.
Finish with a light shadow beneath the fruit if it rests on a surface. Keep that shadow connected near the contact point. Its direction should agree with the seed highlights and the shaded rind.
Try a five-minute cluster first
Before the full fruit, draw one small irregular compartment and fill it with only ten or twelve seed shapes. Check whether the pale gaps, light faces and dark crevices make the group readable. If it looks flat, adjust those three values rather than adding another fifty seeds. For another transparent red study, compare the grape lesson.
The illustration suggests a simplified structure; use a real reference to make decisions about botanical detail.