Watercolor / Beginner
Paint Rusty Metal in Watercolor: Warm Layers and Broken Texture
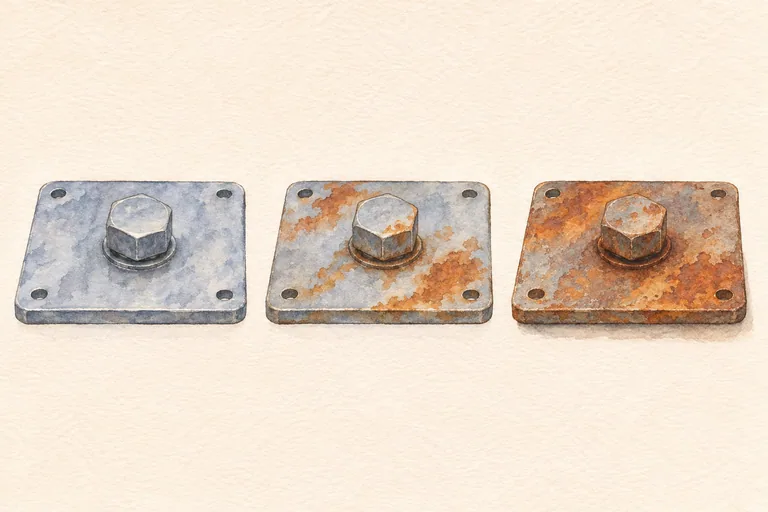
Combine a quiet cool base with grouped warm rust patches and selected dark recesses, leaving enough clean surface for the texture to read.
Choose a small crop with a clear structure
Rust is easier to study when it belongs to a recognizable surface. Use your own photograph of a small metal plate, a bracket or a broad hinge, rather than handling sharp or deteriorating metal. Choose a crop with one simple feature, such as a bolt, and room around the rust patches.
Use watercolor paper, a round brush, a pencil and a limited palette. A yellow earth, a warm reddish brown and a blue can provide useful starting mixtures; test the paints you own. This LUREXEN exercise uses an original simplified plate study. The linked DANIEL SMITH article offers artist context on rusty subjects; we are not reproducing its painting.
Separate the metal from the rust pattern
Sketch the plate's main edges and the position of the bolt or other feature. Check its raised form and connection before scattering marks around it. A texture study still needs a believable object underneath the stains.
On a small thumbnail, group the rusty areas into two or three irregular masses. Leave some quieter metal showing between them. Avoid covering the entire crop with identical orange dots. The arrangement of the larger patches should remain readable without their fine texture.
Begin with a restrained cool base
Mix a pale blue-gray or neutral wash for the exposed metal and test it on scrap paper. Keep it light enough to allow later warm layers. Paint the large surface simply, preserving any useful pale edge or light-facing part of the bolt.
Let the layer dry fully before adding the next controlled patch. Canson's watercolor guidance explains the distinction between color spreading on a wet surface and clearer marks placed on dry paper. Use that difference deliberately instead of working continuously over a half-dry wash.
Build warm patches with varied edges
Add a pale earth-colored patch within one planned rust group. While it is workable, introduce a little warmer brown in part of it. Let some transitions soften and keep other edges broken and more defined. Repeat on a second group without making an identical shape.
Judge the color when dry. More orange is not always more convincing: rusted surfaces can contain muted yellow, reddish brown and deep neutral areas. Follow your reference and keep the paint transparent enough that the first surface relationships are not immediately buried.
Add texture only where it helps
On a spare sheet, test a few short broken brush marks with a stronger mixture. Adjust the brush load before placing them on the study. Use selected stipples or small irregular accents within the main rust masses, leaving quieter areas between them.
Do not outline every patch. A few darker recesses beside a bolt or along a genuine surface break can add depth, but a ring of dark paint around every orange shape can resemble camouflage. Paint the effect from observation; no scraping, chemical rusting or abrasive treatment of real metal is needed.
Restore the hierarchy before stopping
Step back and check the structure first, the larger warm patches second and the smallest texture last. Add a restrained bolt shadow consistent with the chosen light. Keep a few pale areas so the surface does not become one dark mottled block.
If the marks feel busy, repeat a smaller version with fewer patches rather than adding more detail to explain them. For a related exercise in grouping rough surfaces, see the weathered brick wall lesson. A rust study and a brick study should share observation skills, not the same repeated texture pattern.