Drawing / Beginner
Draw a Padlock: Connect the Shackle Before Adding Metal Shading
Construct one solid body and one attached arch, check the space inside the shackle, then separate the front, side and metal highlights.
Keep the lock closed and the view simple
Choose a plain padlock and place it upright or hold it still for your own reference photograph. A front view or a slight turn is enough for a first study. Avoid adding a chain, dangling keys or an open swinging shackle until the main construction is clear.
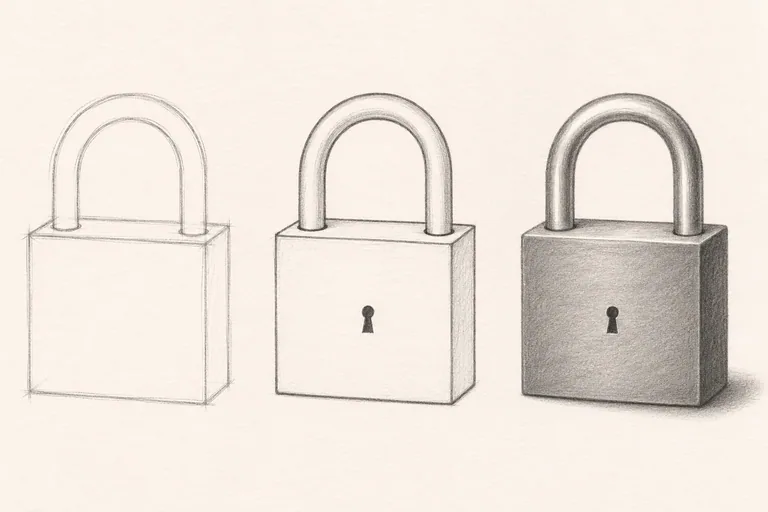
Use drawing paper, an HB pencil and an eraser; a softer pencil is optional for selected darks. The illustration uses a simplified closed lock, with one arch whose two legs enter the top of the body. It is an AI-generated construction example, so compare your own object rather than treating every small contour as a mechanical specification.
Build the body as a small solid block
Mark the body's overall width and height. In a nearly frontal view, keep the front face simple. If the lock is slightly turned, show a narrow side and a little top plane, following the directions you actually see.
Connect matching corners consistently. A side plane that grows wider toward the back can make the box feel twisted. Keep these lines light while you compare them. At this stage, leave out the keyhole and any printed branding; neither will repair an unclear block.
Seat both legs of the shackle
Locate the two places where the metal arch enters the top. Raise one continuous inverted U from those positions. Add its inner edge to give the shackle thickness, keeping the two legs connected through the curve.
Look for an arch that appears too thin at the crown or suddenly wider halfway down one side. Perspective may change the apparent width, but the metal should still feel like one continuous piece. For the closed-lock study, both ends must meet the body rather than hover above it.
Use the open gap as a proportion check
Compare the height and width of the empty space inside the arch with the lock body. Is it tall and narrow, low and broad, or nearly square? Draw that gap as carefully as you draw the metal surrounding it.
Check where the inner legs meet the top plane. Avoid drawing the rear top edge straight through a solid shackle leg. Erase hidden construction lines before strengthening the visible ones. A tiny keyhole can now sit on the front face, with its placement following the reference.
Separate the planes before polishing the metal
Choose a single light direction. Lay a quiet middle value on the front and a different value on the side where appropriate. Keep the contrast broad and readable instead of filling the body with random scratches to suggest metal.
On the shackle, reserve a narrow pale reflection and place a few darker adjacent passages. Reflections depend on the surrounding room, so they do not always follow a simple sphere-shading formula. Use the actual object for their position. Add a modest supporting shadow only if the lock is resting on a surface.
Finish with an attachment audit
Count one body, one connected arch and two seated ends. Follow each visible edge with your eyes and check that it belongs to a solid part. Cover the keyhole briefly: the drawing should still read as a padlock through its structure.
For a second practice, repeat the outline with less shading and compare the inner gap again. The same checking habit is useful in drawing a mug handle by its empty space. For stronger value control, try the pencil-shading foundation lesson.