Beginner / Technique studio
Watercolor Blooms and Backruns: A Three-Swatch Moisture Test
Compare a small water addition in wet, partly drying and dry watercolor washes. Learn to recognize blooms and moisture differences without scrubbing the paper.
One focused technique study.
Keep the first attempt small enough to repeat. Your own subject, paper and materials are the reference.
- Level
- Beginner
- Practice time
- 25–35 minutes, plus drying
- Skill focus
- Moisture differences, surface observation and restrained corrections
- Success looks like
- Compare three dried samples and name one moisture decision you would change in the next wash.
Materials
- Watercolor paper and a scrap from the same sheet
- One familiar watercolor paint and a mixing palette
- A soft round brush, clean water and cloth
- Pencil for notes outside the painted areas
Compare three dried samples and name one moisture decision you would change in the next wash.
Recognize a bloom without treating every irregularity as failure
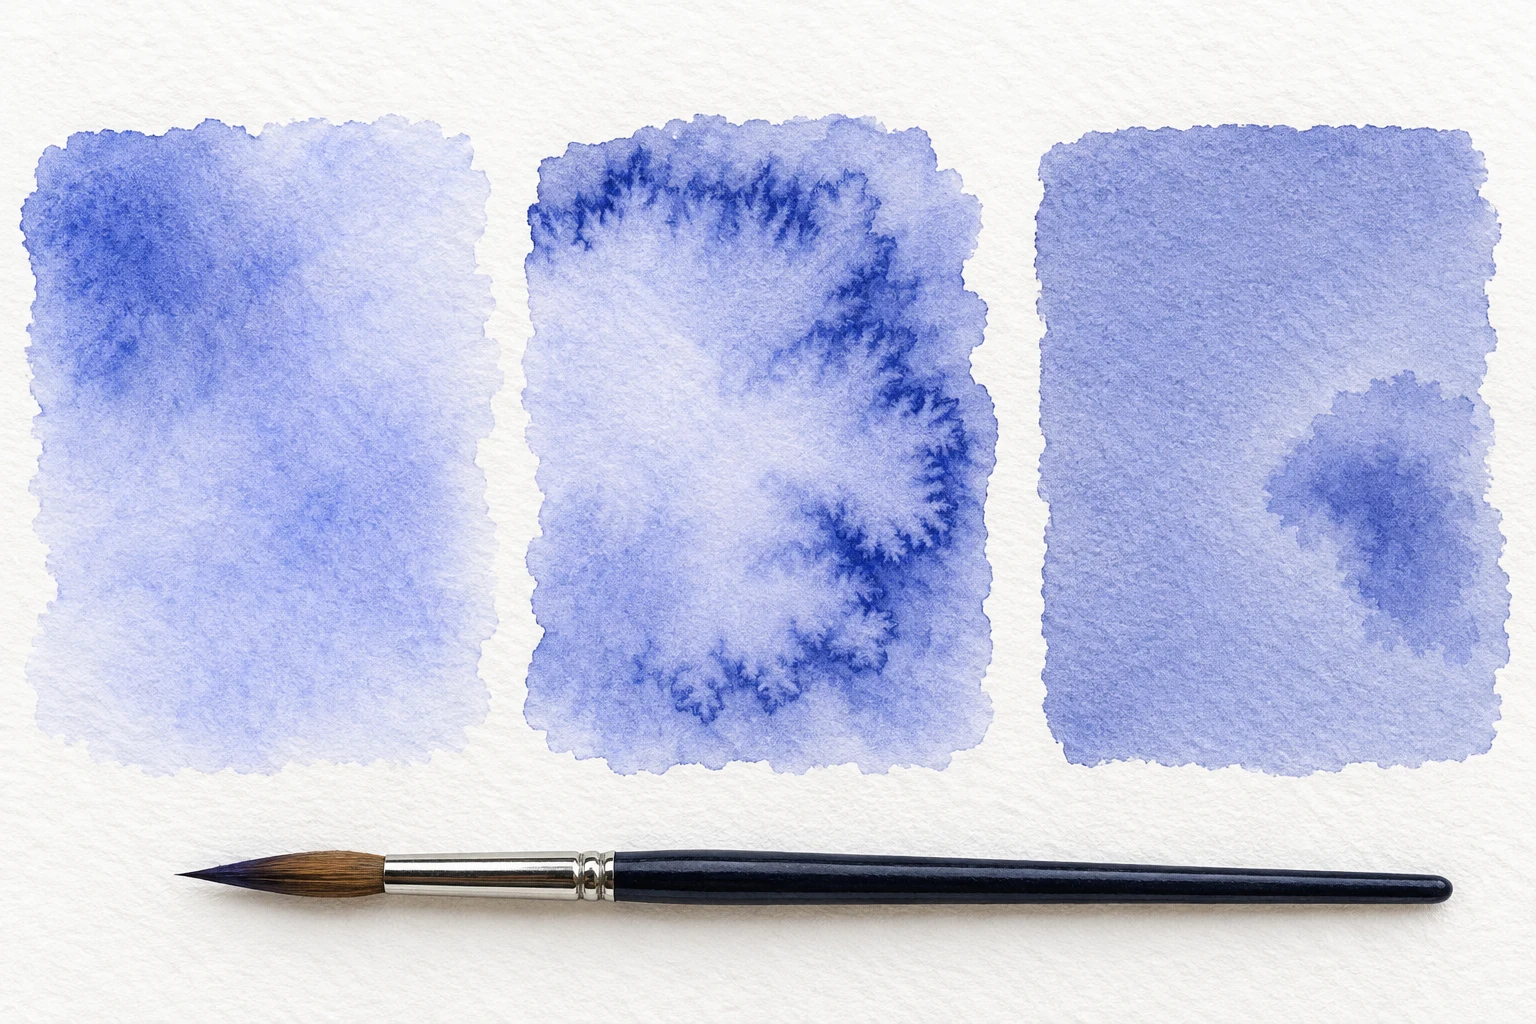
A pale spreading mark with an irregular darker edge is often called a bloom or backrun. It can develop when a wetter addition meets a wash that has begun to dry. The result is not always unwanted: a broken edge may suit a textured passage. First learn to recognize the behavior on scrap instead of correcting a valued painting.
Do not confuse a bloom with every visible watercolor mark. A hard boundary around an entire wash, pigment granulation and a scratch in the paper are different observations. Describe what you actually see before choosing a response. This lesson compares moisture conditions; it does not promise one universal fix.
Prepare three samples with one controlled difference
Paint three small rectangles using the same mixture and similar brush loads. Leave clean gaps and label outside the painted areas. Make them large enough to leave an untouched border around each water touch. If the samples differ greatly in darkness, the comparison becomes harder to interpret.
Test the first while evenly wet, the second after the sheen has reduced, and the third only when fully dry. You may paint the rectangles at different times so the stages are easier to observe. Do not assign fixed drying minutes: paper, water load and room conditions affect the working window.
Watch the wet sample before adding another touch
On the first rectangle, make one small clean-water touch while the wash still has an even wet sheen. Keep the brush movement brief and stop. Observe whether the opening disperses softly or forms a visible edge as the wash settles. Adding more touches would change the test instead of improving its accuracy.
Note the brush condition: damp, visibly loaded or dripping. You do not need a laboratory measurement, but a written observation helps you repeat the setup. Keep the sample flat and undisturbed. Wait for the final dry result before declaring the mark successful or unsuccessful.
Compare partly drying paint with a dry-wash test
Make a similar water touch in the second sample after the sheen has reduced but before the wash is fully dry. Watch the relationship between the pale center and any displaced darker edge. Leave the rectangle alone afterward; chasing the edge with a brush adds another variable.
When the third sample is fully dry, make a small damp mark without scrubbing. This compares rewetting with the earlier conditions, not a guarantee of restoring white. A stain may remain. If the surface begins to look fuzzy or disturbed, stop rather than increasing pressure to force a lighter opening.
Choose prevention or deliberate texture for a new study
Let all three rectangles dry, then compare them from the same viewing distance. Record which condition produced the clearest edge change with these materials. A useful note might be that the partly drying sample formed a stronger rim, or that the dry sample retained more color than expected.
For a smooth passage, prepare enough mixture, avoid a dripping brush and resist returning repeatedly to areas already drying. For texture, try a separate small study where an irregular mark has a purpose. Do not assume that a single successful bloom can be reproduced identically in every pigment or paper.
Repeat one variable rather than repairing everything
Make a second set with only one deliberate change, such as a less watery brush at the partly drying stage. Keep the paint, paper and sample size similar. Compare the results after drying. The goal is a more informed decision, not a page with every accidental mark removed.
If an unwanted backrun appears in a finished painting, pause before attempting a correction. Test a possible response separately and accept that a new study may be safer than further work on a delicate surface. Keep the notes with your swatches so the next session begins with evidence from your own materials.
Change one decision, not everything.
Common mistakes
Every new mark is called a bloom
Compare shape, pigment distribution and paper surface before naming the cause.
A dripping brush changes the whole wash
Reduce the water load and keep each test touch small.
Repeated brushing damages the sheet
Stop, allow drying and test a new approach on scrap.
Think it through
Try answering these questions in your own words, then open each answer to compare. Use the self-check below to review your actual study.
How can I make the swatch comparison fair?
Paint three small rectangles using the same mixture and similar brush loads. Leave clean gaps and label outside the painted areas. Make them large enough to leave an untouched border around each water touch. If the samples differ greatly in darkness, the comparison becomes harder to interpret.
Practice step: Prepare three samples with one controlled difference
What should I do if the paper starts to scuff?
If the surface starts to scuff, stop working that swatch. Record the moisture conditions and repeat on fresh scrap rather than scrubbing it to remove the bloom.
Practice step: Leave a damaged test alone
Review your own study
Tick what you can observe in your work. If a point is unclear, open its practice reminder. Choose one point to focus on next.
Tick a point only when you can observe it in your study.
Choose one focus for your next attempt using the circle beside a point.
This is your own reflection, not an assessment of your artwork. Choices are not saved or uploaded and reset when this page reloads.
Further learning and source context
Original LUREXEN exercise. Further reading supports the general methods, not a recorded test of the illustration.