Watercolor / Beginner
Paint a Mandarin with Curled Peel: Rind, Pith and Juicy Segments
Separate the orange skin, pale inner peel and exposed fruit using broad value shapes before adding a few texture marks.
Arrange one clear peel flap
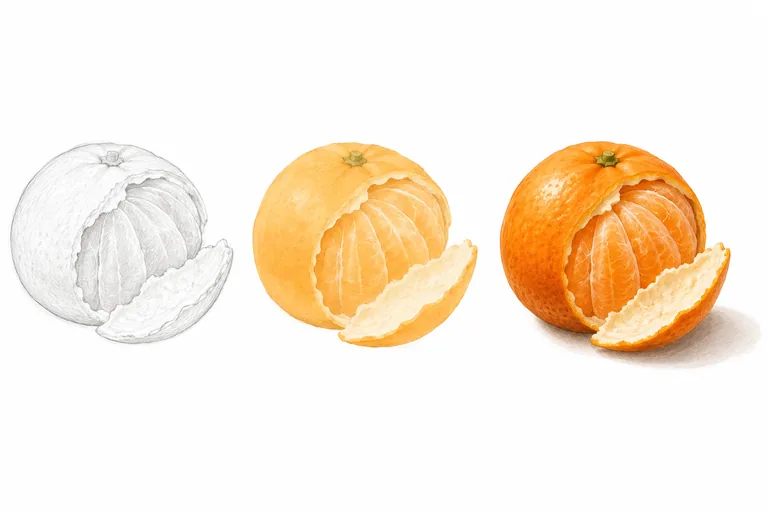
A partly peeled mandarin gives you three surfaces to compare: colored rind, pale pith and softer exposed fruit. Keep the first setup simple. Place one fruit on plain paper and peel back a short flap that stays attached. Use a steady light from one side, or take your own photograph before the peel changes position.
Use watercolor paper, a round brush, yellow and red for an orange mixture, and a small amount of blue or another suitable neutralizing color for the shadow test. Make three swatches: a pale orange, a stronger orange and a quiet gray. There is no fixed mixing ratio; compare the dry swatches with your fruit.
Draw the outside and the pale gap
Sketch the fruit as a slightly flattened rounded shape. Add the attached peel flap, watching the curve where the outer rind turns away and the cream interior becomes visible. Mark the exposed segments with a few long curved divisions. Do not draw a grid of small cells over the whole fruit.
Check the pale shape of the inner peel against the darker fruit behind it. If that gap is clear, the flap will be easier to read even before you add texture. Keep the connection to the fruit visible rather than letting the peel float beside it.
Keep the first washes distinct
Paint the rind and exposed fruit with a light orange wash, reserving the main highlight. Leave the inner peel mostly as paper, with only a very diluted warm or cool tint where needed. Allow the wash to dry before adding darker shapes close to the pale flap.
On the dry base, strengthen the side facing away from the light. Follow the round form instead of adding an even dark rim. Use a slightly different orange strength on the exposed segments so the fruit does not become one undivided shape.
Suggest texture with fewer marks
Use a few tiny touches on the rind’s middle and shadow areas. Keep them irregular and let many disappear. Leave the brightest area comparatively quiet. For the exposed fruit, add a few darker curved separations and small pale gaps; avoid tracing every segment with a thick line.
Try two spare orange patches: cover one with dots and add only five or six marks to the other. Compare them from a distance. Choose the amount that suggests skin without flattening your earlier shading.
Anchor the fruit and review
Add a diluted cast shadow on the side away from the light. Keep it darker near contact and softer farther away. Let the peel flap cast a small separate shadow only if you can see one in your setup. Do not darken the cream pith just to make it stand out; compare it with the darker shapes around it.
Check three things: the peel is attached, its pale inside differs from the rind, and the shadow agrees with the highlight. For a related round-form exercise, see the lemon lesson. The generated example simplifies the structure; use your own observation for the final marks.