Watercolor / Beginner
Pull Color Through a Watercolor Petal: One Stroke, a Softer Tip
Practise moving a small wet color deposit into a pale petal without flooding the shape or repainting it repeatedly.
Give one petal a clear job
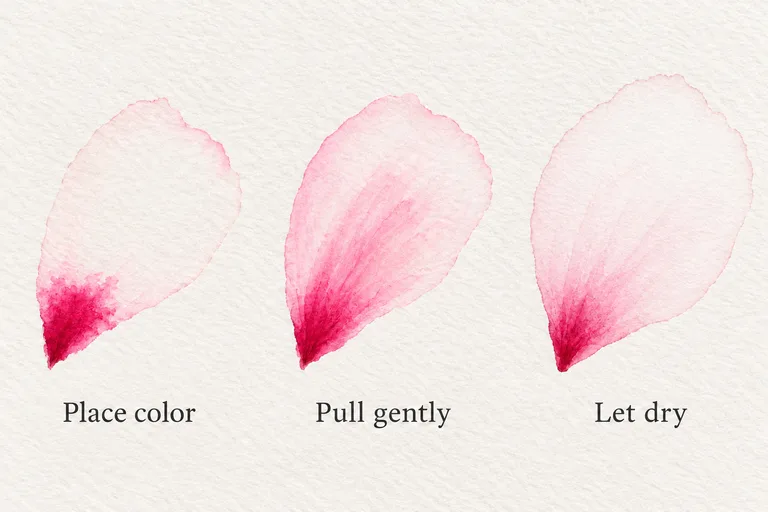
A pale petal is a useful place to practise a controlled transition. The aim here is a stronger base that becomes lighter toward the tip. It is one possible lighting and color arrangement, rather than a rule for every flower. Use a single broad petal so you can watch the water instead of managing a complicated outline.
Set out watercolor paper, one familiar pink or red paint, a round brush, clean water and an absorbent cloth. Keep a scrap of the same paper beside your study. A staining paint may be difficult to lighten later, so plan the pale tip before you begin.
Prepare paint and a damp brush
Mix a small puddle that makes a clearly visible mark on your scrap. Rinse the brush, then touch it to the cloth to remove excess water. It should still move paint but should not release a large bead when it touches the paper. There is no universal number of drops: brush size, paper and room conditions change the result.
Draw three light petal outlines. Leave room between them. On the first, place a short deposit of color at the base on dry paper. While it remains wet, clean and dampen your brush. Touch the edge of the deposit and draw it gently toward the tip, stopping before you fill the whole pale area.
Make three separate attempts
- First petal: pull the color once and leave it alone. Observe how far the first brush pass travels.
- Second petal: use a slightly less wet brush if the first flooded. If the first barely moved, try a little more moisture on scrap before touching the second petal.
- Third petal: repeat the better combination. Keep a sliver of untouched paper at the tip if you want a bright highlight.
Do not force a drying edge to behave like a fresh wash. A wet brush entering a partly drying patch can produce an unwanted bloom. If the transition has started setting, let it dry and use the next petal to test the change.
Read the result after drying
Compare three things: whether the base is darker than the tip, whether the petal silhouette is still clear, and whether the pale area has enough space. A successful exercise need not look perfectly smooth. Small pigment variations can be attractive when the overall transition reads clearly.
If the whole shape becomes dark, your deposit may be too large or you may be carrying color all the way to the tip. If a puddle gathers at the end, reduce brush moisture. If a hard stripe remains at the base, try pulling sooner on the next study. These observations suggest the next experiment; they do not prove a single cause.
Try a three-petal flower
Arrange three large petals around an unpainted center. Work on one petal at a time, letting adjacent wet shapes dry when you want separate edges. Keep the same light-tip idea, then compare the petals from arm's length. Stop before adding veins: the useful skill today is controlling the transition, not finishing a detailed botanical painting.
For a related exercise, read the glazing lesson to see how a later dry layer differs from pulling fresh color.