Watercolor / Beginner
Paint Sea Glass in Watercolor: Soft Color, Frosted Edges and Small Shadows
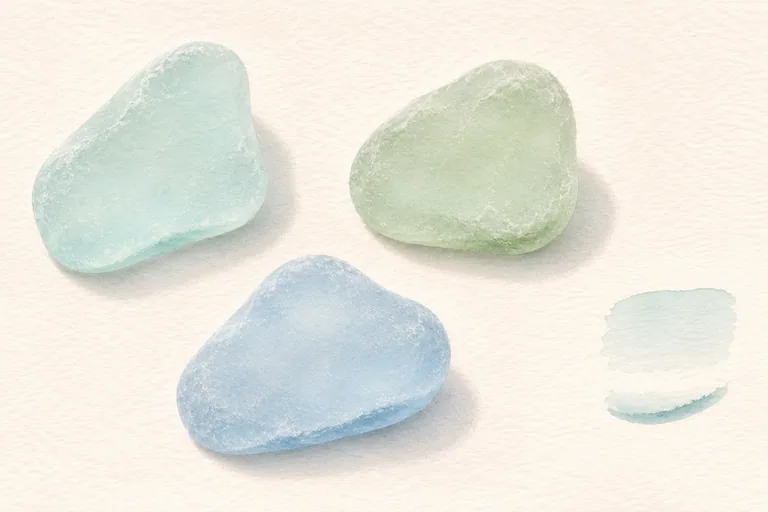
Suggest three worn pieces of sea glass with pale washes, restrained edge changes and shadows that keep them resting on the surface.
Choose a frosted surface rather than a shiny jewel
Sea glass has worn edges and a surface that can appear softly frosted. For this exercise, use your own photograph or safely collected, smooth pieces you already have. Do not use sharp broken glass. Choose three simple silhouettes in pale aqua, blue or muted green on a plain light background.
Gather watercolor paper, a pointed round brush, clean water, a pencil and a small palette. You can mix the colors from paints you own; no exact brand or pigment combination is essential. This proposed exercise aims at the look of frosted glass, not a precise optical study of every transmitted reflection.
Keep the silhouettes different and the spacing clear
Sketch three rounded, irregular shapes with light pencil. Give them different proportions rather than repeating one oval. Leave visible space between them for the first study so you can judge each edge and shadow independently. Choose one consistent light direction.
Mark a small pale area within each shape that will remain lighter than the body color. Avoid tracing a dark highlight border. At this stage, the distinction between a light body and a small darker edge matters more than tiny speckles or surface scratches.
Start with a pale body wash
Test a diluted color on a spare piece of the same paper. Canson recommends checking watercolor strength on another sheet and notes that dry washes can appear lighter. For this study, begin with a wash pale enough to leave room for another layer if you need it.
Paint one shape at a time, leaving the planned light area relatively open. Use a damp clean brush to soften an interior transition while it remains workable. Do not flood the whole sheet: the gaps around the pieces should stay separate from their body washes. Let the first layer dry fully before evaluating it.
Describe thickness without outlining every edge
Add a slightly stronger related color along a short edge or lower side of each piece. Keep the accent uneven and selective. A continuous dark border can make the shape look like a flat plastic token. Let some edges stay quiet and others become more defined.
On dry paper, a new wash produces a more controlled edge than it does on a wet surface. Use that difference deliberately: keep a small lower accent clearer while softening an interior change. If the first attempt becomes too dark, start another small piece rather than scrubbing until the paper loses its surface.
Place a small shadow beneath each piece
Mix a pale neutral shadow and place it on the side away from the light. Keep a narrow contact near the glass, then reduce the strength toward the outer shadow. Follow the reference rather than surrounding every piece with the same gray halo.
A slight cool color in a nearby shadow may suit the study, but do not assume every glass piece projects a bright colored glow. Compare the values: the shadow should explain that the object rests on a surface while allowing the pale glass to remain the subject.
Stop before texture takes over
When dry, view the study from arm's length. Each piece should have a distinct silhouette, a pale body, a modest edge change and a believable contact with the surface. A few tiny irregular marks can suggest wear, but they are optional. You do not need opaque white paint to finish the exercise.
For a useful comparison, paint one separate polished glass study with sharper reserved highlights. The existing glass bauble lesson explores that different surface. Keep the frosted sea-glass study soft enough that the two materials do not look identical.